Updates coming soon …. just wait!

I’m going to start this post with a great quote:
“Every loaf of bread is a tragic story of grains that could have become beer, but didn’t.”
Walter Thornburgh
Isn’t that soooo true … Well I guess this is going to be a tragic story then!
Let touch on the history of sourdough. Sourdough dates back to 3000BC in ancient Egypt and is the oldest form of a leaven (also called levain) bread. Leavened bread is a bread that contains an agent to rise the bread. Well obviously there was no yeast, baking soda or baking powder in ancient times. What happened was probably they had left bread dough out and the flora and microorganisms took to the mixture. The result was a bread that would rise by itself, was lighter and tasted better. And would have been considered sourdough bread.
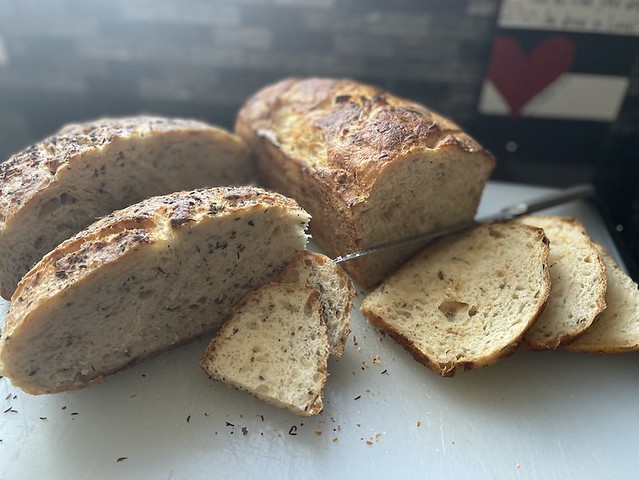
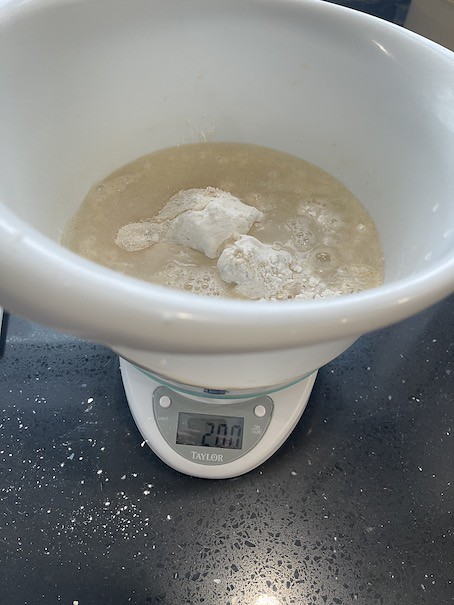
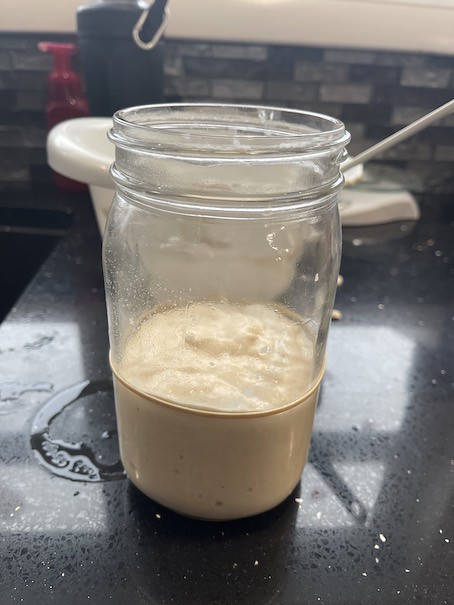
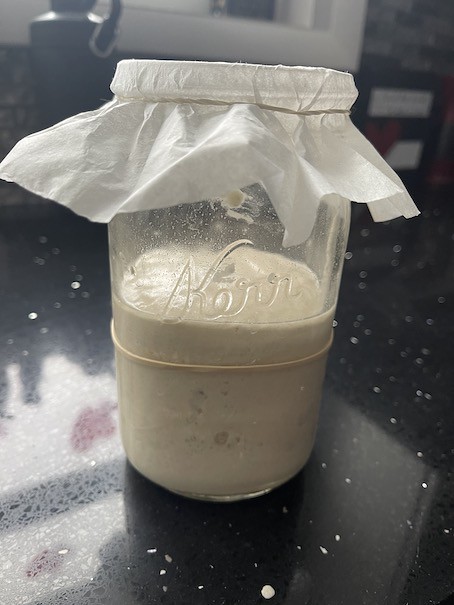
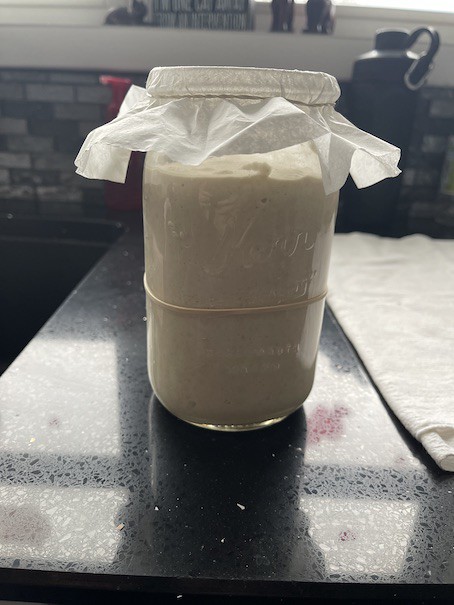
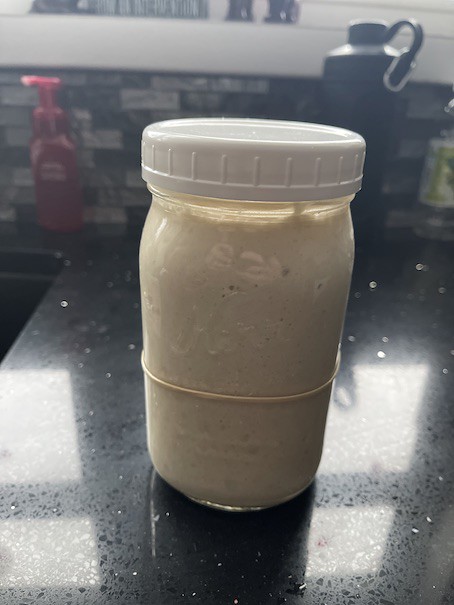
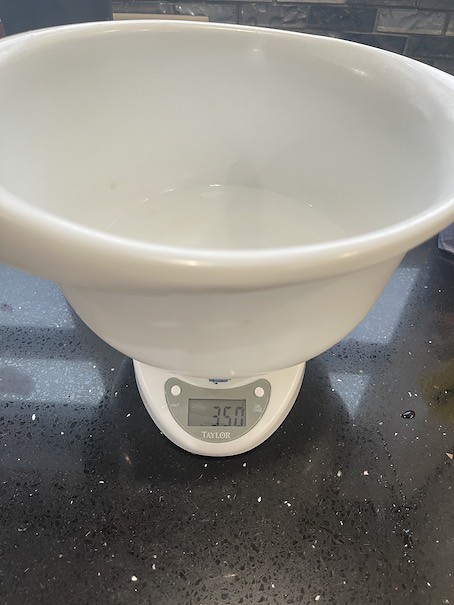
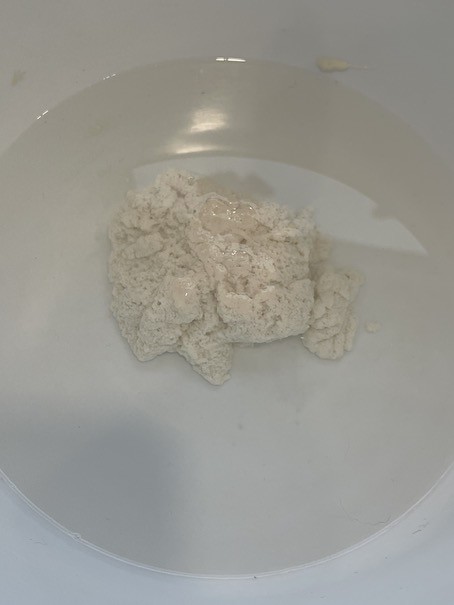
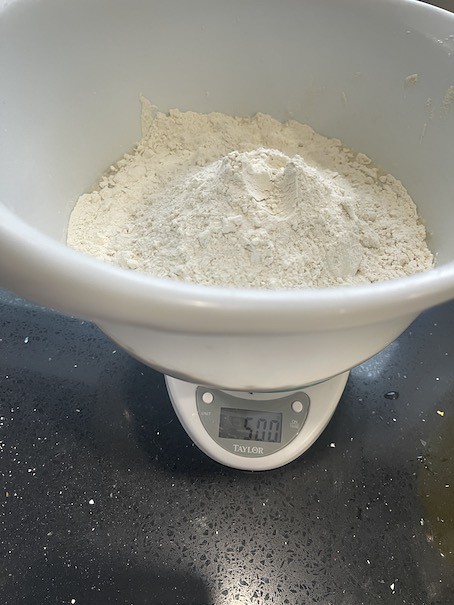
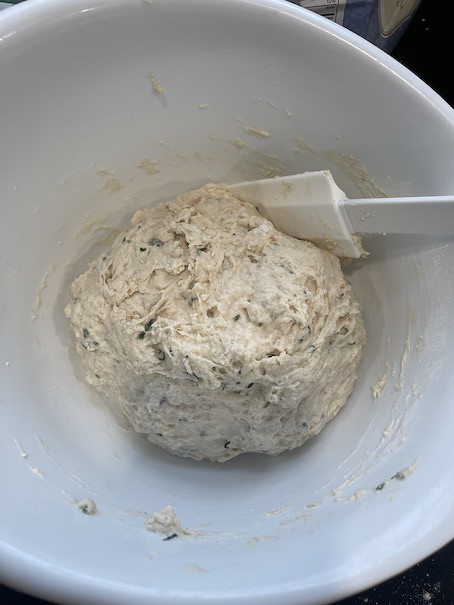
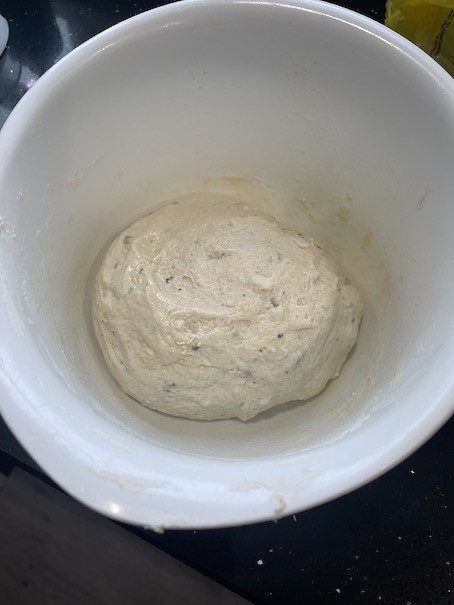
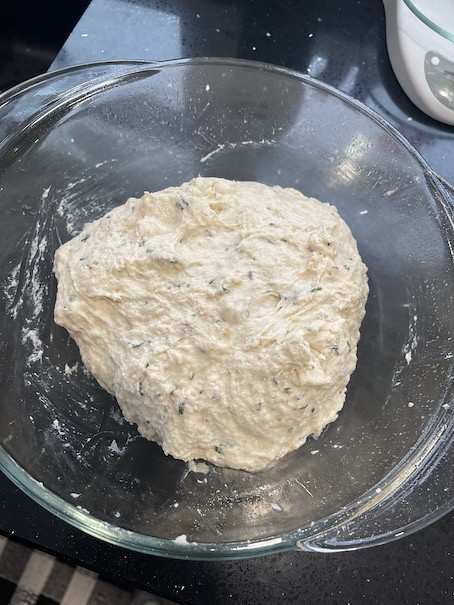
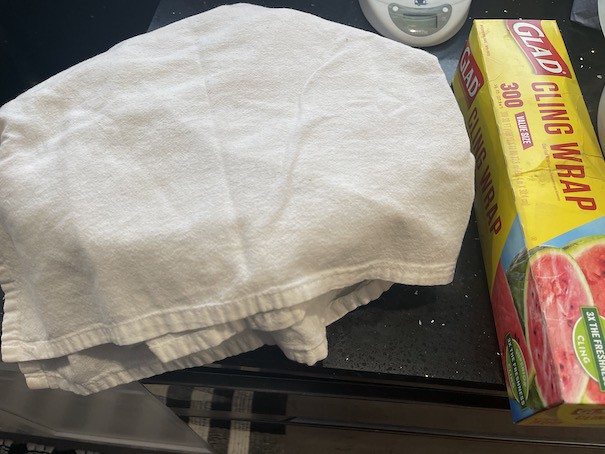
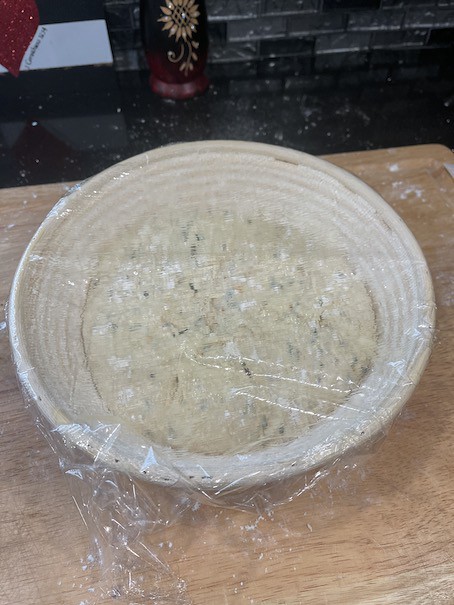
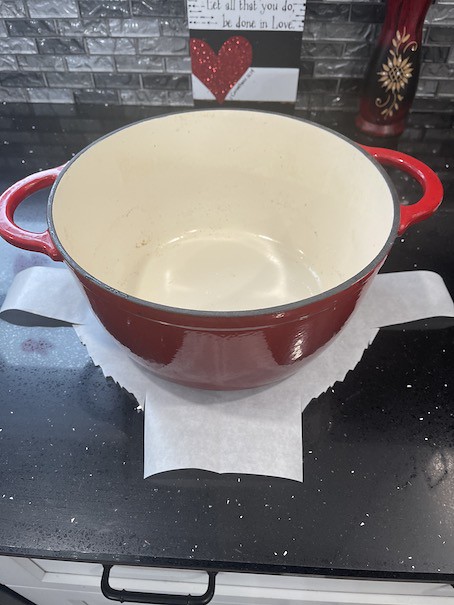
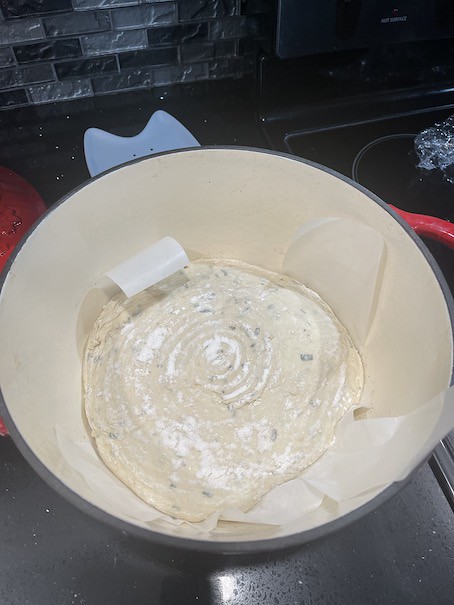
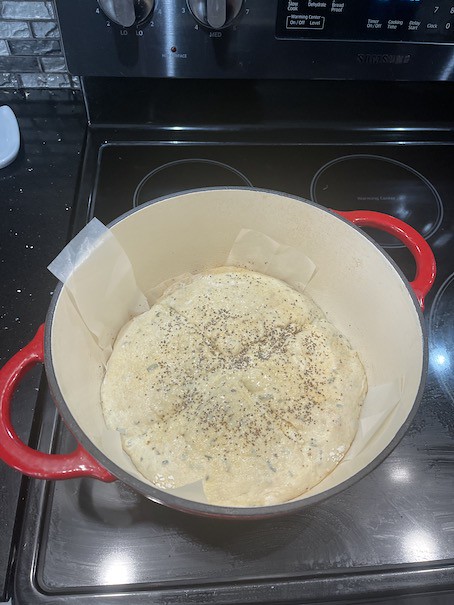
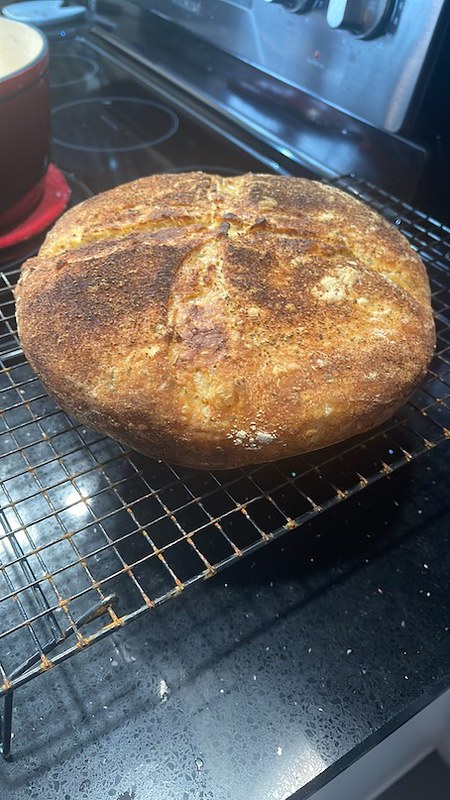
Click here to see the info: All sourdough bread needs to begin from a starter. A sourdough starter is a mixture of flour, water and sometimes sugar. Sits at ambient room temperature and allows wild yeast and flora in the air, and the grain/flour, to inoculate the mixture. The starter’s fermentation will occur in a few days and will give the starter its “sour” taste and smell. After the initial growth of the starter it is ready to use, for years and years, if fed and treated right! Once you have a strong and thriving starter all you need to do is replenish it, keep it stored in the refrigerator (or cool dark place), and it will last indefinitely. If your starter turns color, has a pink or orange tint, colored streaks or it just smells “off” to you … toss it, because it has gone bad. Leaving it out too long, two-weeks or more, leaving it uncovered and gets some contaminated with “bad” bacteria … could and will make your starter go bad. The “off” smell I was referring to is from the creation of acetic acid from a stressed out and/or starved culture. It will smell like vinegar or nail polish remover, so if this happens … when it doubt toss it and start over. Making a starter! It’s simple to do … trust me. What “equipment” you’ll need is: Now the ingredients: This is a simple one for the starter Flour Water Existing Culture Now I’m going to skip making a starter culture from scratch … there is numerous ways and just as many articles out there in the process … Allot at least (8) days for making up a starter from scratch first off. Here is a good link(s) for starting from square one: What I’m showing you is how to start from an existing sourdough starter / culture. These steps are the same I use for maintenance feedings as well for your leaven starter. When it’s time to refresh the culture, use the same container as a permanent home and don’t wash out the container. If the container DOES need to be washed though, feel free. Discard all of the original / previous starter except for the required retained culture amount noted below. Standard Size Starter – 450 grams – [100% Hydration] Double Size Starter – 850 grams – [100% Hydration] Mix by hand until all combined. Cover and let sit at room temperature for 20 to 24 hours, then refrigerate. I’ll be making a standard 450 gram starter this time … Start with measuring out 200 grams (or 1-1/4 cup + 2 Tbsp + 2-1/2 tsp) of flour in a bowl. Then zero out / tare the scale and add 200 grams (or 3/4 cup + 1 Tbsp + 1 tsp) of tepid water Then zero out / tare the scale again and add 50 grams (or 1/4 cup) of retained starter culture Next discard all of the original starter from the vessel. If you don’t discard the initial starter it will grow too big and be difficult to manage. Only make starters to the size you intend to use timely. Mix thoroughly by hand, or with a spatula or spoon, and pour into your vessel. Trying not to spill over the rim … which luckily I did not miss for the picture! Once all the starter is in the vessel / jar mark the level with a rubber band or marker Then cover with a coffee filter, cheese cloth or plastic wrap Monitor the starter … after (1) hour you’ll see there has been some growth and activity After (2) hours just over doubled in size … As you see, allow room in your vessel for growth. At the (3) hour mark (yes the jar is ALMOST filled!) … At this point I’m loosely putting a lid on the jar and putting into the refrigerator to slow down and to keep until next weekend for baking. That all you need to do for maintenance feedings or replenishing your sourdough starter. Now that you know how to make and feed a starter … next making and baking bread with your starter! First off there are soo0 many sourdough bread recipes out there. Standard sourdough bread, rustic sourdough bread, sourdough pretzels, then even to sourdough waffles, pancakes and pizza crust. All can be made with sourdough and much more! What I’m going to show is just a tried and true, very simple sourdough bread recipe (4) ingredients. Sourdough Bread Recipe – [70% Hydration] First, measure out your warm / tepid water – 350 grams (or 1-1/2 cup and 2 tbls) Then add your 50 grams (or 1/4 cup) active sourdough starter culture. The best time to do this is about 3 to 4 hrs after a fresh feeding of the starter. Not necessary but it will ensure the starter is at it’s prime / peak. Throughly mix the combine the sourdough starter and water. If you are using a food scale, zero out / tare the scale and add 500 grams (or 4 cups + 2 Tbsp) for white flour or bread flour. And last of the ingredients is salt. Again zero out / tare the scale, if you are using one, and add 10 grams (or 1/1/2 tsp) of plain old table salt. Next combine, mix and fold the dough – This can be done by hand, with a spatula or mixer. If you are using a mixer, just operate the mixer on slow until the flour and water are complete mixed together. Do not over do to for this step …. it is not needed since we’ll be doing a bulk rise / fermentation. Once combined let for dough sit / rest for 30mins to 1hr (or longer if you want). The gluten begins forming and bonding, the dough starts to strengthen itself. The protease enzymes will break down protein is work on the dough. This then increases the dough and it’s extensibility. As you can see below the dough looks more like traditional bread dough after the autolyse pause rest step. Next you will knead the fold the dough itself for a good 10 minutes or so. Cover the bread dough with a damp kitchen towel (or plastic wrap and towel) and let it rise for 8 to 10 hours at room temperature. This bulk rise I will typically let rise overnight. After the bulk rise, gently remove the dough from the bowl onto a lightly floured surface. Tuck the edges of the dough into the center and work around the edges until you’ve tucked them all in. Flip the ball dough over. Let it rest for 5 to 10 minutes. Using your hands, gently pull the dough ball towards you, letting its grip on the counter pull it into a tighter ball. Rotate the dough slightly and repeat around the edges until you’ve formed a tight ball. Prepare a bread proofing basket, if you have one, by dusting it well with flour. You can use a medium mixing bowl (about 8 inches across). To prepare the mixing bowl, you’ll want to coat it generously with cooking spray and then flour very well, or you can line it with a kitchen towel and dust it very well with flour. Place your dough ball, smooth top down, into your prepared basket or bowl, and cover with a damp towel. Let the dough rest for 1 to 2 hours, at room temperature, or until it’s spread out a bit and looks puffy. If you are planning on cooking the bread in a dutch oven or oven safe pot make a parchment paper template with straight sections to allow lifting of the bread after baking. Ensure that the parchment paper fits into the inside of the pot well. After the dough is risen for the 2nd proof, place the parchment paper cutout centered on top of the proofing basket or bowl. Then place a cutting board on top and flip over the proofing basket/bowl and cutting board. Carefully remove the proofing basket and lower the dough into the dutch over / pot with the parchment paper template. Score the top with a lame, or sharp knife (serrated knife works, too) and as you see I topped the bread dough with some more spices. Now place the COVERED dutch oven in a preheat oven set to 450° F. If you don’t have a lid for you oven safe pot you can use aluminum foil wrapped top. Place the dutch oven in the hot oven and cook for 30 minutes. After 30 mins, remove the lid and put the dutch oven back in the oven, uncovered, for another 20 to 30 minutes. The bread will be very dark and sound hollow when tapped when it is done. You can bake it to your likeness though. Remove the pan from the oven, and then remove the bread from the pan via the parchment paper and let it cool on a wire rack for 1 hour before slicing and serving. Once you get your first sourdough bread under your belt … then start to experiment with additives, spices and herbs. Be sure to try to stay with the 70% hydration ratio with your bread if you want a light and fluffy bread. Also cooking it at the high temp inside the dutch oven, locks in the moisture released from the dough and aids in lifting the dough while baking. The crust this will create will be very crunchy crust on the bread.
Sourdough Starter – What is it?
Sourdough Starter – How to make it?
I use a wide mouth mason jar with a rubber banded coffee filter on top. You need something to keep anything from getting into the starter and allow it to breathe.
Once I get to storing it in the refrigerator, I swap out the coffee filter for a plastic lid. I would not use a standard metal lid and band though in fear that it could react from the acidity of the starter. Be sure your vessel has enough room in it as it will more than double in size.
I use a rubber band on the outside of the jar to mark the height of the starter upon feeding it. You could also use a marker as well – but the rubber band is simple and won’t wash away.
I recommend using a kitchen scale that can measure in grams. But you can use volume for measuring out (I’ll provide both weight and cups/tbsp/tsp below.
I use a plastic narrow spatula, one that is smaller than the mason jar opening. You also use a spoon but I would not recommend a wooden spoon since the starter will be sticky and harder to clean off a wooden spoon.
Ok … if you are starting from SCATCH … you’ll want to start with Whole Wheat, Rye Flour or Pumpernickel Flour. The yeast and bacteria actually really prefers whole grain/wheat flour, it’s easier to get the starter going than using just white flour. Once the starter is established you can switch the Unbleached White Flour for feedings
As far as the water. You should use Chlorine Free Water – since chlorine is used to kill harmful microorganisms. Almost all city tap water is treated with chlorine and chloramine. So I suggest using filtered, distilled water or bottled water is you know your tap water is heavily treated … but I’ll tell you, I just use tap water and have NOT had any problems. Yet.
You can either purchase a commercial (Cultures for Life, King Arther, Breadtopia for example) – It can come in powder form, wet starter form or dried flakes. The better way is to get it from a friend, a family member, a neighbor, anyone who is making sourdough bread.
This refresh feeding, enough for four loaves of pan bread in the next 7 to 10 days.


This is where you can lend your friend, neighbor or family member some of your discarded culture.


Sourdough Bread – How to make it?


This step is called autolyse. The pause prior to kneading will enhance the extensibility and possibly increased flavor in your bread.
Then transfer the kneaded dough into a lightly greased bowl to mix and bulk ferment.


First off … what’s Kimchi.
Kimchi is a fermented food that is from Korea, similar to sauerkraut since it uses cabbage and is fermented … but that’s the only similarity. It’s a staple side dish the Korean cuisine.
Kimchi is typically made from fermented cabbage, radish, cucumber, green onion and brussel spouts even. There are various types and named differently for the vegetable used.
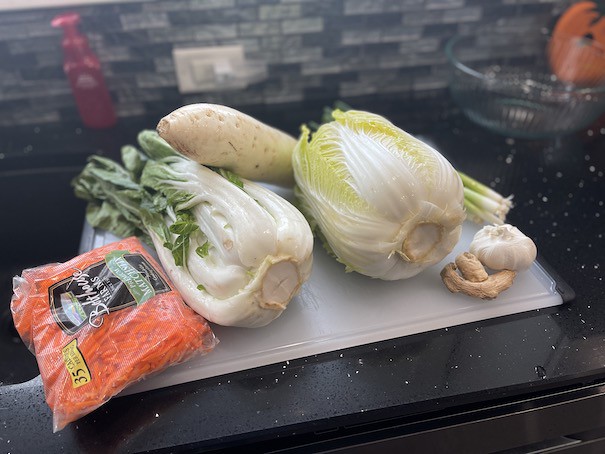
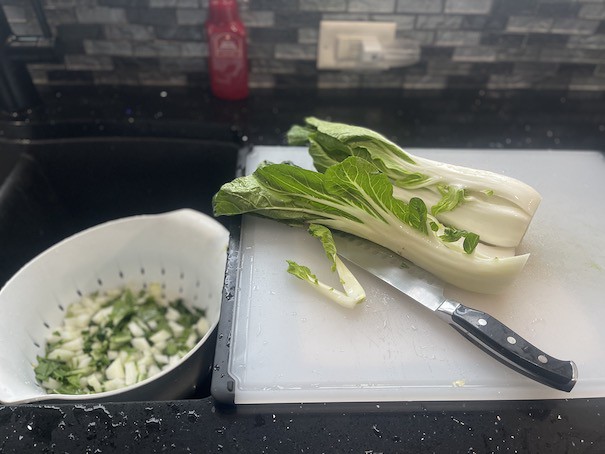
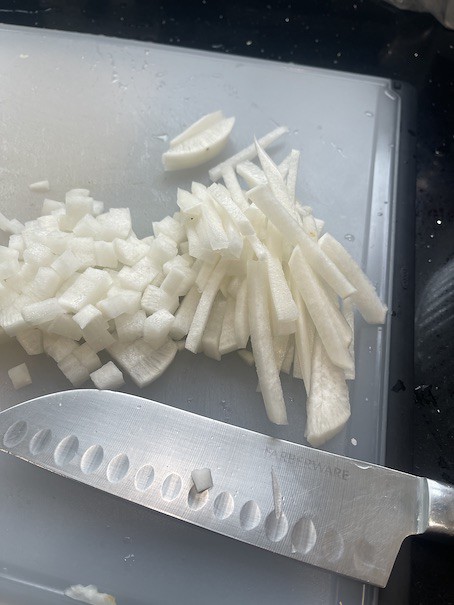
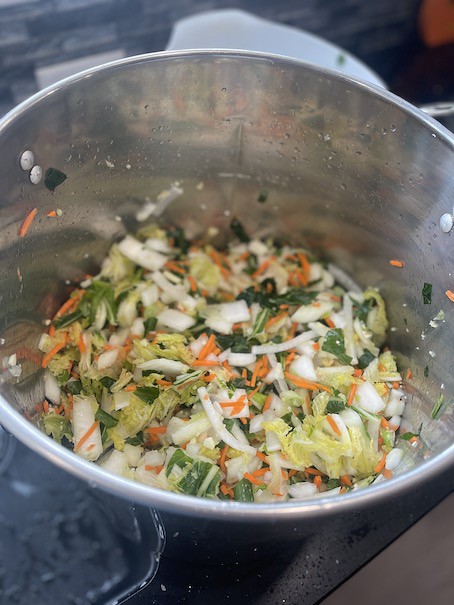
Click here to see the info: First the ingredients: Now for the ingredients that you’ll have to look for Now additional adds .. I’ve read about Asian pears, plums, oysters, squid to name a few Starting with your throughly rinsing cabbage. Cut the napa cabbage lengthwise into quarters and discard roots. For the bok choy cut end of root off and discard any outer bad leaves. Cut napa cabbage and bok choy into approx. 2” square pieces. Keep bite size but not too small. Put napa cabbage and bok choy into a large bowl or crock. Sprinkle the 1/2 cup salt all over and turn over and sprinkle. Make sure the salt is blended into cabbage. Let sit and turn over every 30 minutes for 1-1/2 hours. Alternate option is to cover with cold water, approx. 12 cups. Cover with a plate to keep cabbage mixture submerged and cover with a towel or plastic wrap and let sit on counter at room temperature for 12 to 24 hours. Next peel and cut daikon radish in match sticks size and/or small cubes. And then add to the salted cabbage. You can also skip this addition … but I typically get the cabbage going first and then add the daikon. But have also completely skip brining the radish. Cut and combine all the other ingredients into large glass or metal bowl while the cabbage is brining / resting with the salt. Next after 1 to 1-1/2 hours of total salting throughly rinse the cabbage in cold water 3 times to clean it. You should NOT taste any salt left in the cabbage mixture And then drain completely in a colander IMPORTANT NOTE: Do NOT use WHITE plastic bowls past this point. Use glass, metal or something that will not get stained! Combine all the other ingredients – I’m using a stainless steel pot. Starting mixing in the red pepper flakes, chili paste, fish sauce and any other additions. Trying not to bruise or break cabbage upon mixing and combining the ingredients. I wear nitrile gloves and mix by hand. Again if you don’t wear gloves … your hands will turn red and possibly burn / irritate your skin. Taste me … use a spoon or wear gloves! You can add water, more Gochujang, or even soy sauce, if you need more juice / liquid. But trust me … it will seem “dry” at first until you start packing the mixture Start to pack tightly into glass containers or air-tight sealable plastic container (I prefer using a 1 gallon glass jar) – You can use canning jars even. But if you are using plastic … you will never get the smell or stains out of it. Pack the mixture into the container and do not allow voids or air pockets. Leaving about 1/2″ to 3/4″ head-space at the top of jar(s). Cover loosely with a lid, cover with cheese cloth or use an airlock. I’m using an airlock this go around. Also placing the vessel onto a plate in case the ferment bubbles out the top – Thus why you need to leave some head-space. Let sit in mild, dark place for 24 hours (or room temperature for 12 hours covered) After resting open the lid to release gases (if not using an airlock) that have built up and repress mixture tightly into container. The mixture should be covered by the natural brine it has made. Then refrigerate your kimchi and eat as soon as your liking. Kimchi is an acquired taste for some … but give a chance and you never know, you may love it!
Now I have to confess
I just eyeball and wing it when making Kimchi – (But below is my starter recipe)
Once you’ve made it a few times … you just add or subtract as neeeded.
(At least 2-1/2 lbs mininum cabbage or combination)
(Add more for spicy hotter Kimchi – I use Assi Brand Red Pepper Powder)
(Available in most Korean / Asian markets or Amazon)
(You can skip complete, or even make a rice flour porridge but Gochujang is easiest)
(The last couple batches I started use this – I use Chung Jung One O’Food)
(Available in most Korean / Asian markets or Amazon)


But sure to check kimchi periodically for built up gases and liquid release.
So what to do when your a homebrewer, a home fermenter, have a green thumb and have an over abundance of tomatoes?
Well after John, the owner of House of Homebrew of Green Bay, suggests on social media .. you decide to make tomato wine!
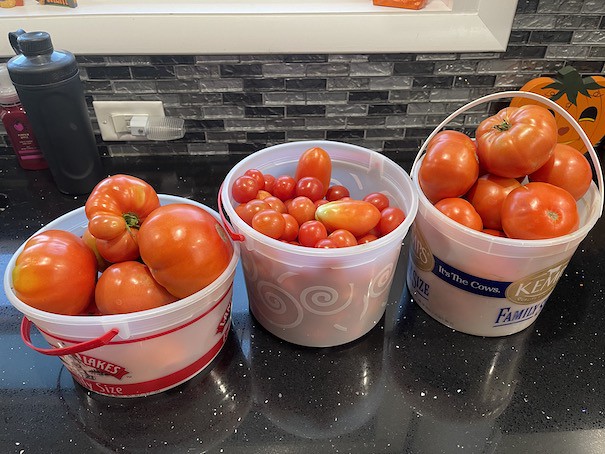
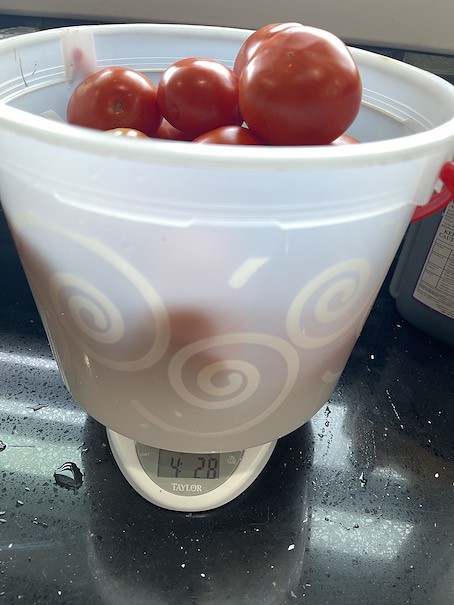
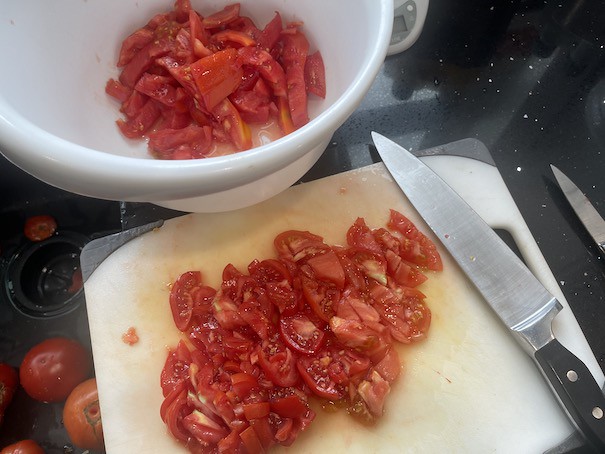
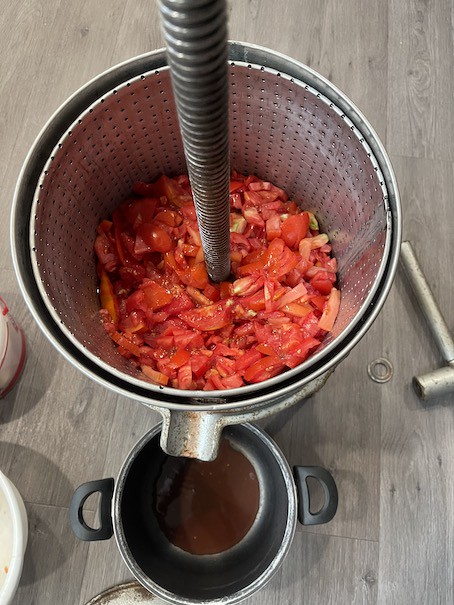
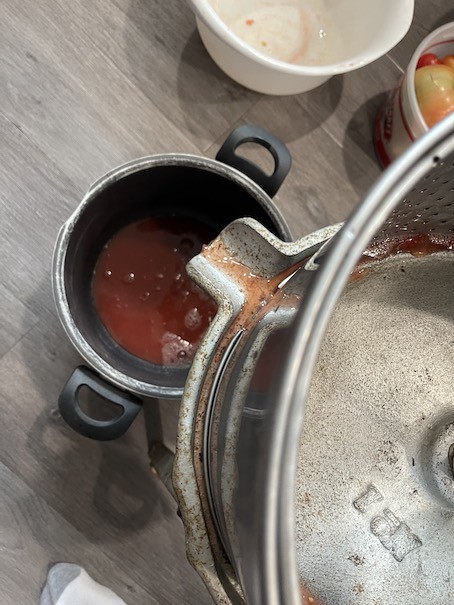
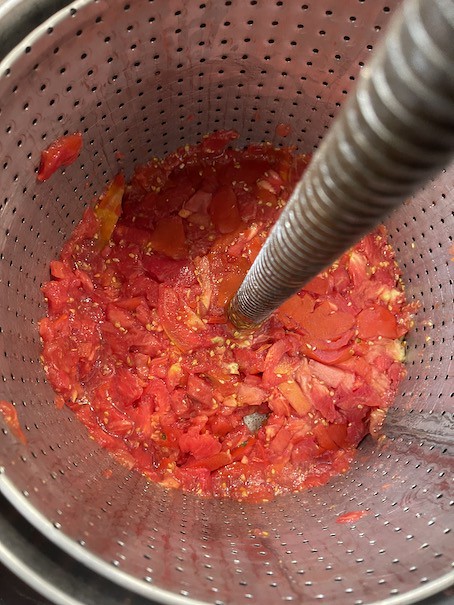
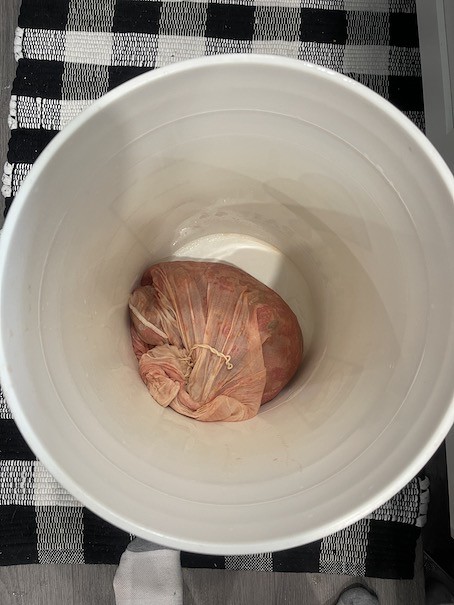
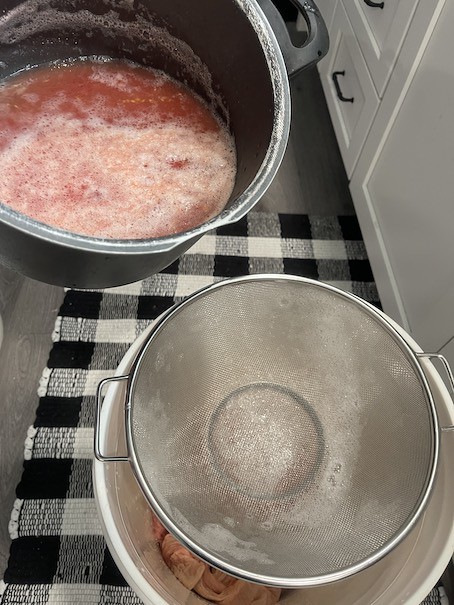
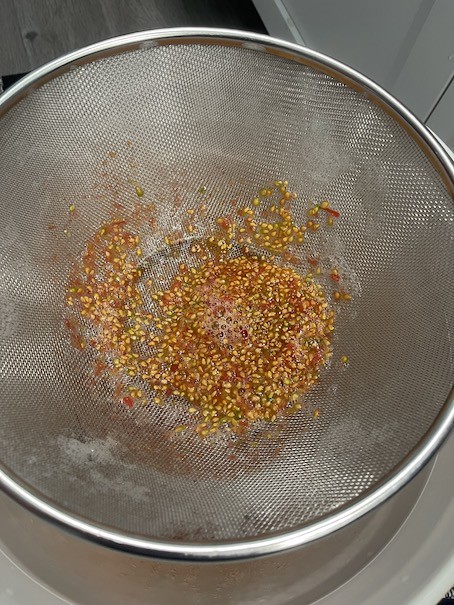
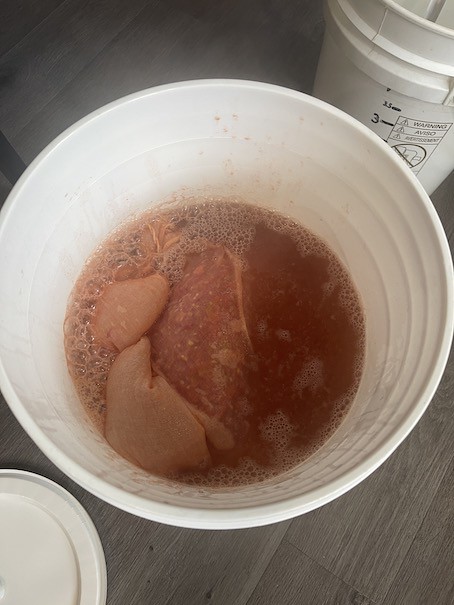
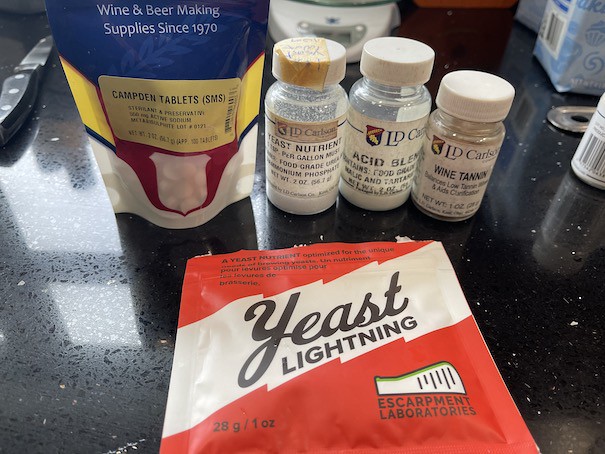
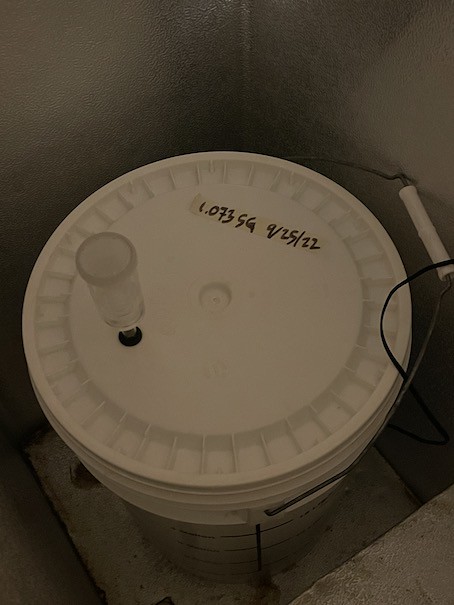
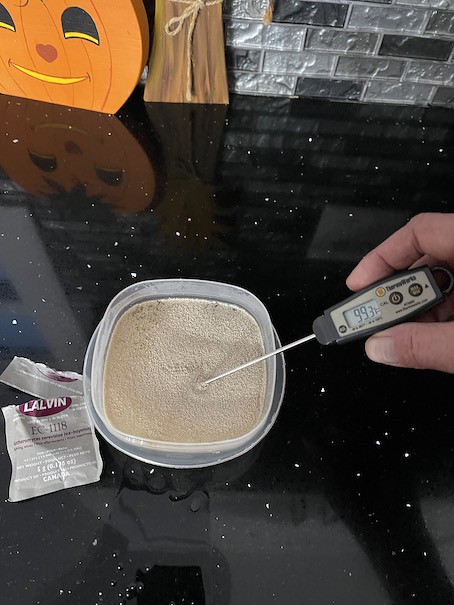
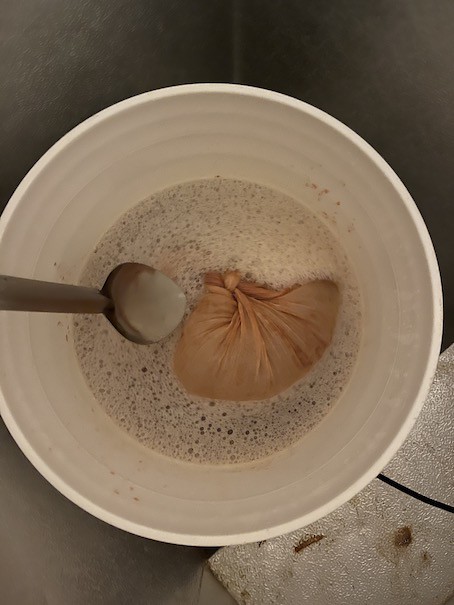
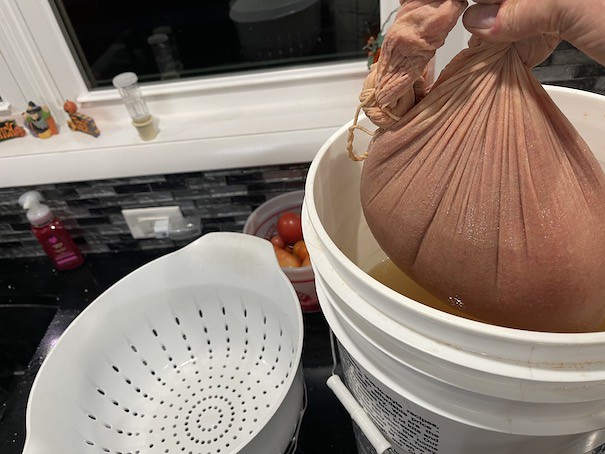
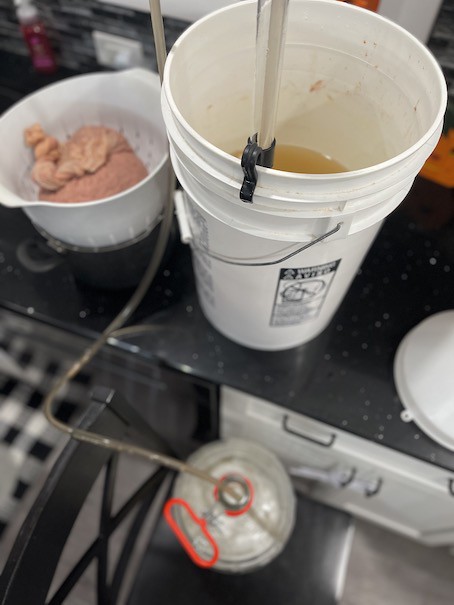
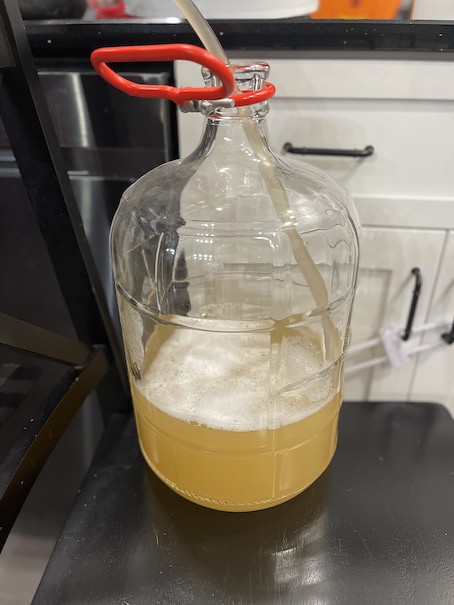
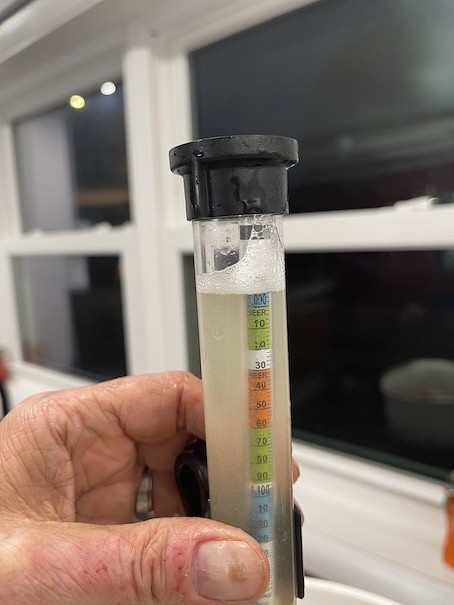
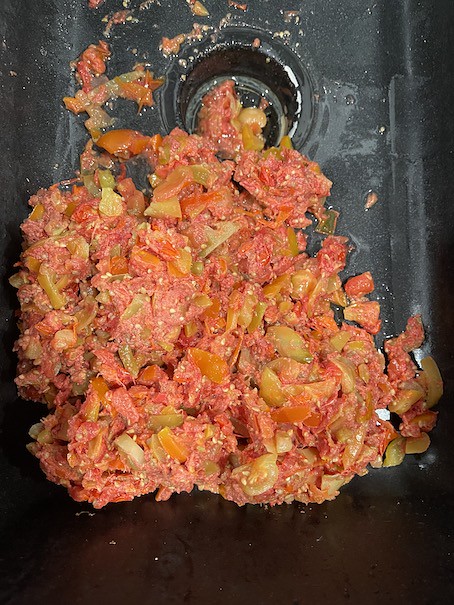
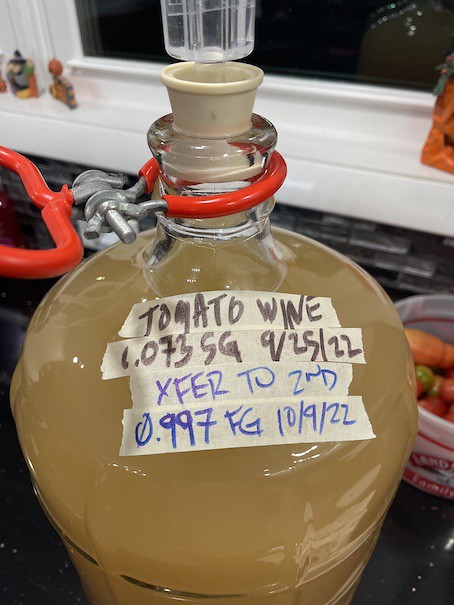
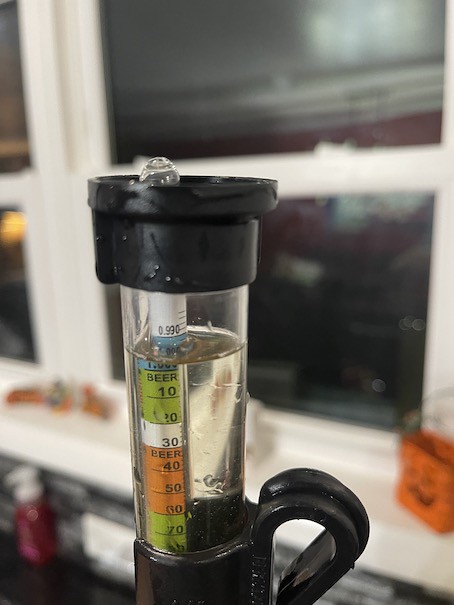
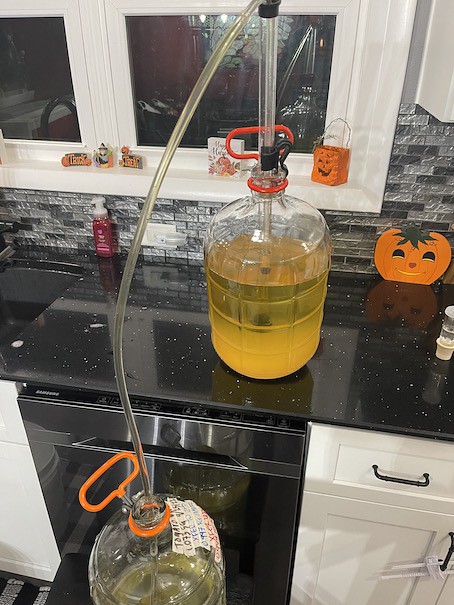
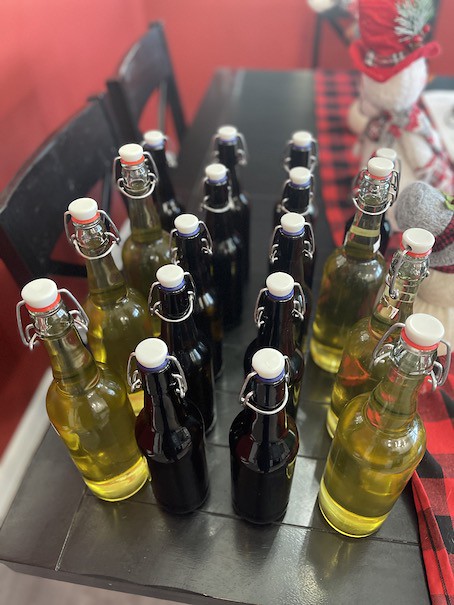
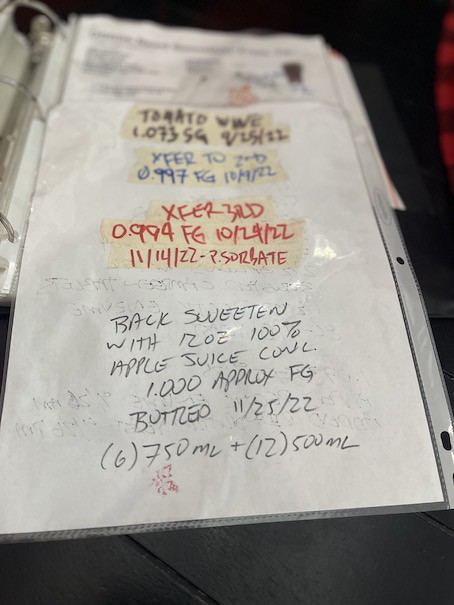
Click here to see the info: Now at first I wasn’t sure if John was just kidding, but I have actually heard of this though. And with some Google searching and some memory recall … I re-found the world of fruit and country wine guru Jack Keller. If you’ve never heard of Jack Keller here is brief intro. Jack’s WineBlog was the first wine blog on the internet. He unfortunately passed away in Sept 2020 but has impact on fruit and country wine lives on. His site doesn’t exist anymore but the Web Archive has it and can be partially accessed here: Link to Archived Winemaking.JackKeller – And someone also Scribd a collection of his recipes and as a PDF download as well Jack did have one book that is still available for purchase on Amazon. Most, if not all, of Jack’s recipes are at 1 gallon batch sizes … so scaling is easy. Do you yourself favor and look him up! He logged numerous wine recipes. Jack’s Keller – Red Tomato Wine – 1 Gallon The only word of caution for red tomato wine is to use only perfectly ripe fruit. They should also be freshly picked. If you have a large crop coming ripe all at once and have already canned enough for the off seasons, then this recipe will be a God-send. It makes one gallon of wine, but multiply it out by however many 4-lb batches of tomatoes you have for the wine. • 4 lbs fresh, ripe red tomatoes Now a brief write up about this recipe: Boil water and dissolve sugar. Meanwhile, wash and cut fruit into chunks, discarding any bruised or insect-scarred parts. Pour fruit and any juice from cutting into nylon straining bag in primary. Tie bag and squash the fruit. Pour the boiling water with dissolved sugar over fruit. Cover and allow to cool one hour, then add acid blend, tannin, yeast nutrient, and crushed Campden tablet. Stir, recover and after 12 hours add pectic enzyme. Wait another 12 hours and add yeast. Stir twice a day for 7 days. Remove nylon bag and allow to drip drain, adding drained juice to primary; do not squeeze bag. Siphon liquid off sediments into secondary, top up, and fit airlock. Rack every 60 days until wine clears, then wait two weeks and rack again. Add stabilizer, wait 10 days, sweeten to taste with sugar water, then bottle. Wine will mature in one year and should be served chilled. Now since I have a lot of tomatoes I decided to go with 3 gallons batch size so I just simpy times all the items listed by 3x – so yes I’m using over 12lbs of tomatoes! You do not use 3x the yeast though, a 11gram sachet is enough for a 6 gallon batch. I also have a press I’ll be using and I’m going to go with a Staggered Nutrient Additions approach with this ferment. Here is a link to how to: Improve you Mead with Staggered Nutrient Additions. Now before you start anything let us talk sanitization. Even though is a “country wine” you need to ensure that everything is cleaned and sanitized. You can’t sanitize anything that isn’t clean … so clean and rinse through and sanitize. I suggest either StarSan or IOStar – Follow mixing and usage instructions – typically it’s 1oz of sanitizer to 5 gallons of water for a concentration of 25 ppm in solution for sanitizer. ANYTHING that touches the fermenter or the must .. I mean anything .. be sure to sanitize it! You’ll thank me later! So start by weigh out 4 lbs of tomatoes. I went over a few ounces over since you will be cutting out any bad or bruised areas – Vary as needed but I processed the tomatoes in the manageable size of the 4lbs at a time. Now cut up the tomatoes into quartered chucks. You don’t have to dice the tomatoes and I will be using a press so “chucks” as shown below should be good. Doesn’t have to be pretty. Now like I said I’ll be using a press so I load 4lbs of tomatoes at a time into the press. If you don’t have a press just bag the tomatoes into a straining bag in primary, tie the bag and squash the fruit in the primary. And squeeze and collect the juice. I then collect the squeezed out tomatoes and place in a straining bag. And place into the primary fermenter (Which I suggest a bucket for primary with the bagged tomatoes and glass for secondary and tertiary fermentations) Now since tomatoes seeds are small and the press allowed the seeds to press though into the juice I decided to use a sanitized wire sieve to collect the seeds. And you see it was a good idea! Now collect and bring you water to a boil to dissolve your sugar. Since we’ll be adding Campden tablets I decided to use my municipal water, otherwise a good idea would be using RO Water. I collected 10-1/2 quarts (2-5/8 gallons) but I reserved back 1.5 quarts incase I didn’t like the SG gravity (which I ended up added back in the volume of water per the recipe) I did also substituted 1lb of sugar for 1lb of honey. Be very careful with boiling your sugar solution – hot and stick bubbling boiling liquid is no joke … so watch what you’re doing! Then pour the sugar solution into the fermenter and over the tomatoes in the strainer bag and cover and let sit for 1 hour. After 1 hour add the crushed Campden tablet(s), yeast nutrient (DAP), acid blend (or malic acid) and wine tannin and mix with a santized spoon to incorporate the additives. Be sure to take a cooled hydrometer sample and record you starting gravity (SG) Now cover and let you must set for 12 hours. And if you have a fermentation chamber that’s a plus, especially for chilling down the hot must. Then 12 hours later add your pectic enzyme. Pectic enzyme breaks down the pectins, which is the “fleshy” part of the fruit. Stir and recover to incorporate the enzymes into the must. And let sit for another 12 hours to allow the enzymes to work. After 12 hours rehydrate your yeast (as manufacturer suggests) – I also added GoFerm to assist the yeast. And pitch your yeast into the must. Now at this point …. this is as far I as I have documented and will be adding to this as the ferment progress along. One day after pitching yeast I gave the must a stir to degas and to punch down the bagged tomatoes back into the must. On odd days I’m stirring and degassing and on even days adding nutrients. So day 2 I’m adding nutrients. Fermentation has slowly started and there are signs of fermentation. But with adding FermAid-K and DAP with a stir it kicks up fermentation for sure! It’s been 2 weeks and it’s time to transfer a secondary fermenter. It’s going from the bucket fermenter into a 3gallon glass carboy. First pulling the bag with the crushed tomatoes. And then placing it into a sanitized colander and collect the dripping into a sanitized pot. Do not totally squeeze the bag … just collect what runs off naturally. While that drains, using an auto siphon that you have sanitized prior, siphon the must into the carboy. Be sure to take a record you gravity – As you can see it has fully fermented below 1.00 to a FG of 0.997 – Very similar to a hard cider ferment finishing dry. Now you can combine the collect drippings from the bag … and below what the spent tomatoes look like. Transfer all the clear must leaving behind the spent yeast and spent trub in the bucket You can transfer and nearly completely to the top of the ferment since there should not be any additional fermentation happening. Now allow the wine to set to settle out in secondary for atleast another 30 days changing on it once a week. I record the steps and reading on masking tape. More updates as it progress …. So check back in from time to time for updates! Time for another transfer! Even though it is SUPER clear already … we can do better yet and even without clarifying additives. Take a reading sample and record the gravity and taste sample! As you can see it has dropped a few more points yet from the transfer to secondary. We’re down to 0.994 … drying out! Be sure to sanitize everything prior to transferring! Leaving behind the spent yeast and the fermentation trub / debris that is settled out. Transferring my notes to the next carboy … Next you need to decide to back sweeten or not. If you want a dry wine … leave it as is and go ahead and bottle. But if you desire to add back some sweetness, without fermentation happening again in the bottle, you HAVE to stabilize the must/wine. If you don’t stabilize prior to back sweetening you will make bottle bombs. To stabilize your wine, cider or mead for back sweetening the process is the same. Add 1/2 teaspoon of Potassium Sorbate (K.Sorbate) per gallon and 1/4 teaspoon of Potassium Metabisulphite (K.Meta) , or (1) crushed campden tablet per gallon. The potassium sorbate (K.Sorbate) prevents new fermentation from happening (Note: potassium sorbate should not be added without potassium metabisulphite – you can end up with off flavors otherwise) The potassium metabisulphite (K.Meta) is a preservative and should kill off any lingering wild yeast cells and protects from bacteria. Now to back sweeten your wine there are varies ways. You can add a 1:1 ratio of water and sugar – (Example: boil 100grams of sugar in 100ml of water is the easiest). Adding fruit juice is another way. Or you can also use Wine Conditioner as well. This tomato wine it’s very “cider’ like so I decided to use 100% apple juice concentrate to back sweeten with. I have used this before in the past. White grape juice concentrate would have also been a good choice as well – but wasn’t available at the store. Then bottle as normal. Making sure to throughly clean and sanitize your bottles. I opt’d for a mixture of 750ml bottles an 500ml bottles (with swing tops) Be sure to note and record all your readings, recipe and notations throughout the process. I hope you enjoy this …. I will attempt to get tasting remarks from club members!

The Winemaking Home Page―the largest home winemaking website in the world and was the first winemaking blog on the internet.
(I’m using a mix of beefsteak, better boy, roma and jetstar)
• 2 lbs granulated sugar
(I used some honey along with sugar)
• 3-1/2 qts water
• 2 tsp acid blend
• 1/2 tsp pectic enzyme
• 1/8 tsp grape tannin
• 1 tsp yeast nutrient
• 1 crushed Campden tablet
• 1 pkg Champagne or Montrachet yeast
(I’m using EC-1118 Yeast)


Hard to see from the angle and I had to hold the hydrometer .. but I got a 1.073 / 1.075 SG – You can adjust up or down as you like. I’m fine with the low 1.070s for a starting gravity.


Day 2 – Update After Yeast Pitch


2 Week Mark – Transfer to Secondary Fermenter


3 to 4 Week Mark – Transfer to Tertiary Fermenter


5th to 6th Week Mark
Stabilizing, Back Sweetening and BottlingStabilizing
Dissolve the K.Sorbate and K.Meta in some water before adding to the wine. Then give the wine at least (5) days to (1) week for the K.Sorbate and K.Meta to halt the yeast’s ability to ferment sugars anymore. This does not kill off the yeast that still remains, but stops the ability to eat / ferment any sugars.


Documentation is important and makes you be able to repeat and improve in the future.

The BJCP Describes a Czech Dark Lager:
… the Czech equivalent of a dark lager ranging in character from Munich Dunkel to Schwarzbier, but typically with greater malt richness and hop character (aroma, flavor, and/or bitterness).
Click here to see the info: Michael Tonsmeire (from The Mad Fermentationist, author of The American Sour Beers book and owner brewer of Sapwood Cellars) the described Czech Dark Lager like this: “I think the entry-level description is, think of a Czech pilsner versus a German pils. Now think of a Schwarzbier, Tmavé pivo (dark beer) is like the Czech version of German schwarzbier. It’s a little rounder, a little maltier, a little smoother, maybe, with a little more body.” Czech Dark Lager – BJCP Style 3D I reached out to one of our favorite club member Scott “Dr. Scott” Voskuil and he has graciously provided his excellent Czech Dark Lager recipe! “For your consideration, I humbly submit my recipe. It’s a single decoction, so a fun foray into that endeavor for those who are looking for the opportunity to try that.” So here is his original (15)gallon batch recipe – And below you will find a scaled, and rounded, version of the recipe to standard (5/6)gallon batch size. – Also in the (5)gallon batch size recipe I provided some notes / information on Single Decoction – You take up “Dr Scott” on “..a fun foray into the endeavor..“ 15 Gallon Batch Recipe PDF View / Download of Recipe and BeerSmith BSMX Download 5 Gallon Batch Recipe 5g Version – PDF View / Download of Recipe and BeerSmith BSMX Download Again thanks to “Dr Scott” for sharing his recipe and hope try all of your Czech Dark Lagers in December!
The Second Club Comp for 2022 we, the Manty Malters, are brewing a:
His reply to the request is great (give it a read):
Enjoy and brew your best Czech Dark Lager for December!
Recipe Details
Batch Size
Boil Time
IBU
SRM
Est. OG
Est. FG
ABV
15 gal
60 min
25.1 IBUs
23.6 SRM
1.050
1.012
5.1 %
Actuals
1.052
1.014
5.0 %
Style Details
Name
Cat.
OG Range
FG Range
IBU
SRM
Carb
ABV
Czech Dark Lager
3 D
1.044 - 1.06
1.013 - 1.017
18 - 34
14 - 35
2.2 - 2.7
4.4 - 5.8 %
Fermentables
Name
Amount
%
Pilsner (2 Row) UK
14 lbs
48.28
Munich Malt
9.5 lbs
32.76
Caramunich I (Weyermann)
4 lbs
13.79
Carafa Special III (Weyermann)
1.5 lbs
5.17
Hops
Name
Amount
Time
Use
Form
Alpha %
Saaz
4.25 oz
60 min
Boil
Pellet
5.3
Yeast
Name
Lab
Attenuation
Temperature
Czech Budejovice Lager (WLP802)
White Labs
78%
50°F - 55°F
Mash
Step
Temperature
Time
Protein Rest
122°F
35 min
Saccharification
154°F
45 min
Mash Out
168°F
10 min
Notes
Start with 21 gal total and pull off 6 gal for sparge. Added 10gm chalk. Separated the carafa and ground it with coffee grinder to dust. Added carafa to mash after decoction was pulled. Mash with 15 gal. with strike temp of 150. Normal decoction set at 158 for 20 min of the hour mash. Remove 1/3 (5gal) for decoction and boil for 45 min, then return to mash. New temp was 160 since I did not keep up the temp in the main mash while boiling the decoction. Needed to add 2 gal water to boil to correct for gravity. Slow to lauter. Volume came out right with 1/2 quart trub at bottom of kettle. Ferment at 50.
Download
Download this recipe's BeerXML file
Recipe Details
Batch Size
Boil Time
IBU
SRM
Est. OG
Est. FG
ABV
6 gal
60 min
24.5 IBUs
23.2 SRM
1.050
1.012
5.1 %
Actuals
1.052
1.014
5.0 %
Style Details
Name
Cat.
OG Range
FG Range
IBU
SRM
Carb
ABV
Czech Dark Lager
3 D
1.044 - 1.06
1.013 - 1.017
18 - 34
14 - 35
2.2 - 2.7
4.4 - 5.8 %
Fermentables
Name
Amount
%
Pilsner (2 Row) UK
5.25 lbs
45.16
Munich Malt
3.625 lbs
31.18
Caramunich I (Weyermann)
2 lbs
17.2
Carafa Special III (Weyermann)
12 oz
6.45
Hops
Name
Amount
Time
Use
Form
Alpha %
Saaz
2 oz
60 min
Boil
Pellet
5.3
Yeast
Name
Lab
Attenuation
Temperature
Czech Budejovice Lager (WLP802)
White Labs
78%
50°F - 55°F
Mash
Step
Temperature
Time
Protein Rest
122°F
35 min
Saccharification
154°F
45 min
Mash Out
168°F
10 min
Notes
Original 15 Gallon Batch Notes:
Start with 21 gal total and pull off 6 gal for sparge. Added 10gm chalk. Separated the carafa and ground it with coffee grinder to dust. Added carafa to mash after decoction was pulled. Mash with 15 gal. with strike temp of 150. Normal decoction set at 158 for 20 min of the hour mash. Remove 1/3 (5gal) for decoction and boil for 45 min, then return to mash. New temp was 160 since I did not keep up the temp in the main mash while boiling the decoction. Needed to add 2 gal water to boil to correct for gravity. Slow to lauter. Volume came out right with 1/2 quart trub at bottom of kettle. Ferment at 50.
Typical Single Decoction Info:
Step 1: Mash in
Start your brew day like any other. Heat up your strike water for the first step, the saccharification rest. This step is usually between 145°F to 155°F, depending on the beer style.
Step 2: Perform the saccharification rest
Allow the mash to rest for 30 to 45 minutes.
Step 3: Pull the decoction
The volume should be about one third to one half the size of your mash tun.
Pull off the thickest part of the mash, meaning mostly grain with minimal liquid. The decoction should be quite thick but you should still be able to easily stir it in the decoction kettle.
Slowly bring the decoction to a boil. Make sure to stir regularly to avoid scorching.
Calculate your decoction volume to raise the mash temperature to 170°F.
Step 4: Boil the decoction
Allow the decoction to boil for at least 5 minutes. Boil longer for darker beers to impart more color and caramel flavor, up to 30 minutes.
Step 5: Add back the decoction to the mash
Turn off the heat on the decoction kettle.
To bring the mash up to mash-out temperature, begin transferring the decoction back to the mash tun. Use a large scoop or quart jug to transfer the boiling decoction, one or two quarts at a time. Be very careful as the mixture is still near boiling temperatures.
Stir the mash regularly and monitor the temperature. Once a mash-out temperature of 170°F is reached, hold it at that temperature for 10 minutes. Allow any leftover decoction to chill to 170°F and add that back to the mash tun.
Step 6: Sparge and proceed to the boil to finish the brew as normal
Batch sparge, fly sparge, or no-sparge – whichever method you choose, and collect the full volume of wort in your boil kettle.
Download
Download this recipe's BeerXML file
So for the first 2022 Club Competition we all had a chance to do Mike “Tasty” McDole’s Janet’s Brown
Click here to see the info: Stylistically, Janet’s Brown should be under 10C. – American Brown Ale but due to the OG, IBU and ABV (and for the people who brewed this know it’s a big beer) should be considered as under 21B – Speciality IPA. So combining the best of both categories we should get an excellent beer! The BJCP overall impression they describes Brown IPA as the following: And for American Brown And Janet’s Brown should be the best combination of an American Brown and an IPA – Thus the subcategory Specialty – Brown IPA for Janet’s Brown Link to Recipe to make you own Janet’s Brown And the outcome from the (6) Entries of Janet’s Brown All (6) brew were EXCELLENTLY brewed beers. With all being the same recipe there were slight variations. Still amazes me in the differences, especially with multiple people utilizing the MoreBeer kits! If you ever looking for the “what” to brew next … I highly recommend looking into making this beer!
The competition was a Best of Show BOS / People’s Choice type of judging to select: 1st, 2nd and 3rd. – So overall impression and personal preference.
Overall Impression
Hoppy, bitter, and moderately strong like an American IPA, but with dark caramel, chocolate, toffee, or dark fruit character as in an American Brown Ale. Retaining the dryish finish and lean body that makes IPAs so drinkable, a Brown IPA is a little more flavorful and malty than an American IPA without being sweet or heavy.
Overall Impression
Can be considered a bigger, maltier, hoppier interpretation of Northern English brown ale or a hoppier, less malty Brown Porter, often including the citrus-accented hop presence that is characteristic of American hop varieties.
Or the AHA 2021 Big Brew Recipe AHA Link
Or purchase from MoreBeer – Pre-Made Kit All Grain or Extract [PDF Recipe]
(More Beer donates 100% of the proceeds to the Leukemia & Lymphoma Society)
Irish Extra Stout
April’s meeting we had (1) examples of a Irish Extra Stout
Here are some details for the Irish Extra Stout – BJCP Category 15-C
https://www.bjcp.org/style/2015/15/15C/irish-extra-stout/
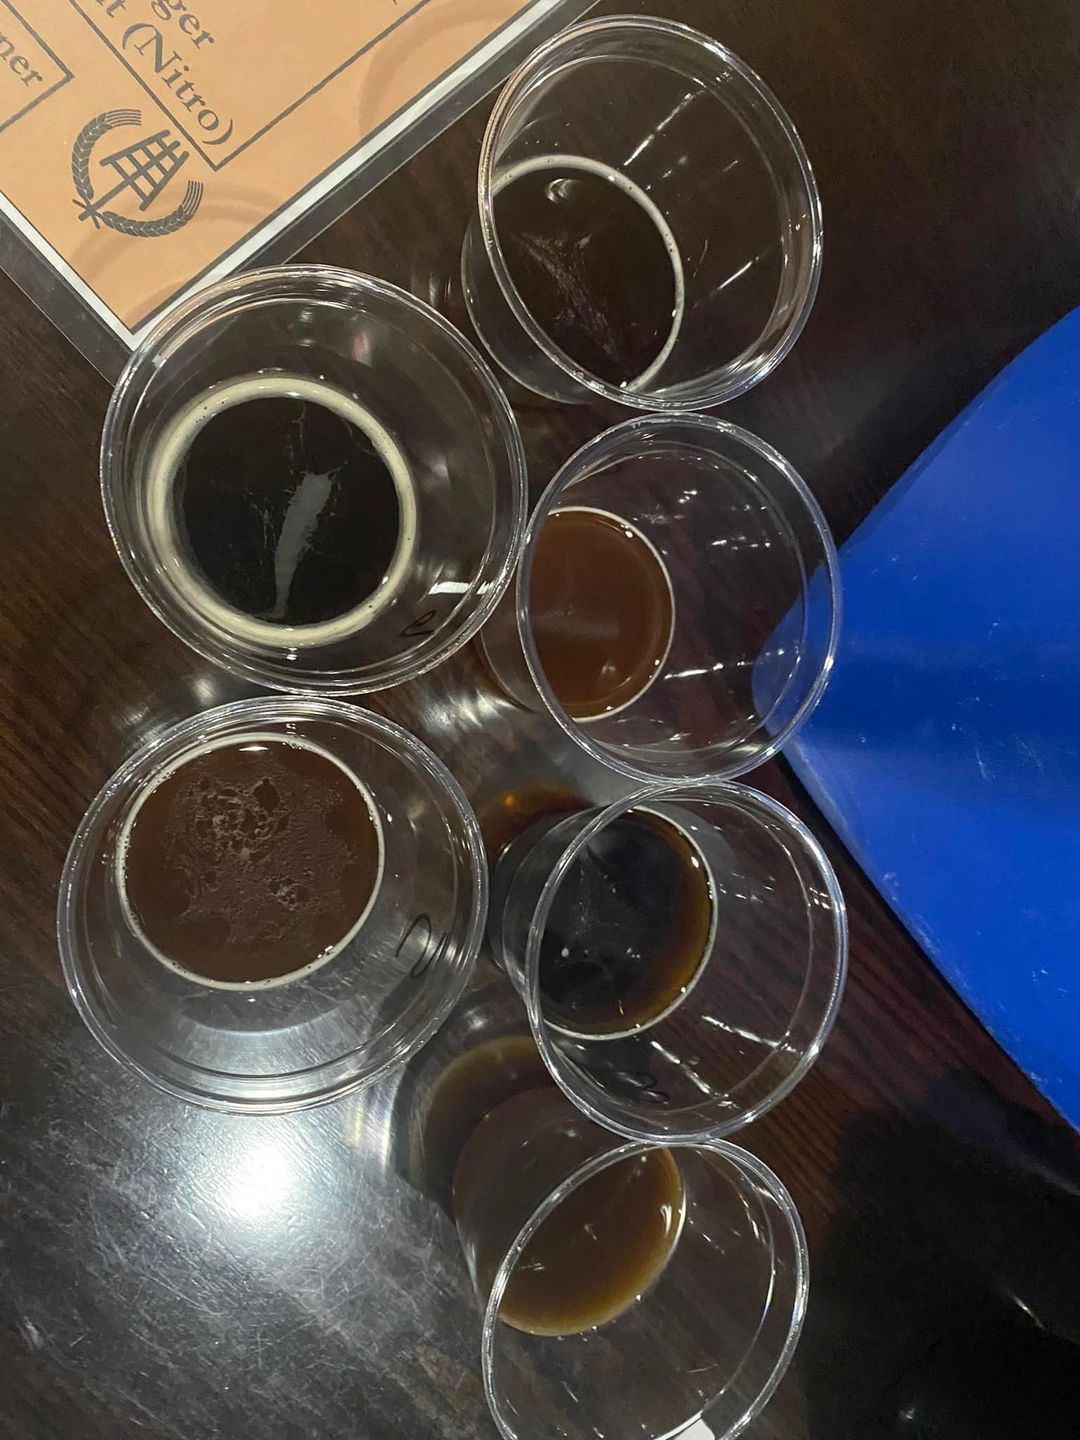
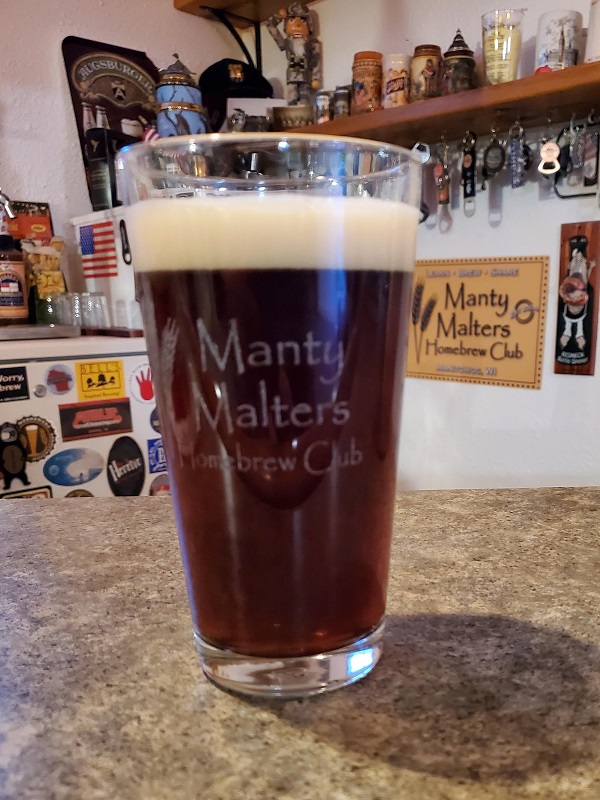
Click here to see the info: And Beersmith’s describes it as: A fuller-bodied black beer with a pronounced roasted flavor, often similar to coffee and dark chocolate with some malty complexity. The balance can range from moderately bittersweet to bitter, with the more balanced versions having up to moderate malty richness and the bitter versions being quite dry. History: Same roots as Irish stout, but as a stronger product. Guinness Extra Stout (Extra Superior Porter, later Double Stout) was first brewed in 1821, and was primarily a bottled product. Described by Guinness as a “more full-bodied beer with a deeper characteristic roasted bitterness and a rich, mature texture. Of all the types of Guinness available today, this is the closest to the porter originally brewed by Arthur Guinness.” Note that in modern times, Guinness Extra Stout has different strengths in different regions; the European version is around 4.2% and fits in the Irish Stout style. Style Comparison: Midway between an Irish Stout and a Foreign Extra Stout in strength and flavor intensity, although with a similar balance. More body, richness, and often malt complexity than an Irish Stout. Black in color, not brown like a porter. We had examples brought by Alex Hartlaub Alex’s recipe details including water adjusts from BeerSmith: We what will be your next beer to brew? Possibly look into making a Irish Extra Stout!
Recipe Details
Batch Size
Boil Time
IBU
SRM
Est. OG
Est. FG
ABV
11 gal
60 min
33.2 IBUs
37.3064546
1.056
1.011
5.9 %
Actuals
1.054
1.01
5.8 %
Style Details
Name
Cat.
OG Range
FG Range
IBU
SRM
Carb
ABV
Irish Extra Stout
15 C
1.052 - 1.062
1.01 - 1.014
35 - 50
25 - 40
2.4 - 2.6
5.5 - 6.5 %
Fermentables
Name
Amount
%
Maris Otter (Crisp)
12 lbs
64.86
Barley, Flaked (Briess)
4 lbs
21.62
Black Barley (Briess)
2 lbs
10.81
Chocolate (Briess)
8 oz
2.7
Hops
Name
Amount
Time
Use
Form
Alpha %
Nugget
1 oz
40 min
Boil
Pellet
13
East Kent Goldings (EKG)
1 oz
30 min
Boil
Pellet
5
HBC 472
1 oz
10 min
Boil
Pellet
9
Miscs
Name
Amount
Time
Use
Type
Epsom Salt (MgSO4)
7.84 g
60 min
Mash
Water Agent
Baking Soda
5.51 g
60 min
Mash
Water Agent
Calcium Chloride
3.09 g
60 min
Mash
Water Agent
Chalk
2.88 g
60 min
Mash
Water Agent
Gypsum (Calcium Sulfate)
0.43 g
60 min
Mash
Water Agent
Epsom Salt (MgSO4)
2.91 g
60 min
Water Agent
Baking Soda
2.05 g
60 min
Water Agent
Calcium Chloride
1.15 g
60 min
Water Agent
Chalk
1.07 g
60 min
Water Agent
Gypsum (Calcium Sulfate)
0.16 g
60 min
Water Agent
Yeast
Name
Lab
Attenuation
Temperature
Lutra Kveik (OYL-071)
Omega
79%
68°F - 95°F
Mash
Step
Temperature
Time
Mash In
152°F
75 min
Ramp up for mash out
168°F
10 min
Download
Download this recipe's BeerXML file
Dunkles Weissbier
April’s meeting we had (2) examples of a Dunkles Weissbier – April’s Style of the Month
Here are some details for the German Wheat Beer – BJCP Category 10-B
https://dev.bjcp.org/style/2015/10/10B/dunkles-weissbier/
Click here to see the info: And Beersmith’s describes it as: A moderately dark German wheat beer with a distinctive banana-and-clove yeast character, supported by a toasted bread or caramel malt flavor. Highly carbonated and refreshing, with a creamy, fluffy texture and light finish that encourages drinking. History: Bavaria has a wheat beer brewing traditional hundreds of years old, but the brewing right was reserved for Bavarian royalty until the late 1700s. Old-fashioned Bavarian wheat beer was often dark, as were most beer of the day. Pale weissbier started to become popular in the 1960s, but traditional dark wheat beer remained somewhat of an old person’s drink. Style Comparison: Reflecting the best yeast and wheat character of a weissbier blended with the malty richness of a Munich dunkel. The banana and clove character is often less apparent than in a weissbier due to the increased maltiness. We had examples brought by Brian Lesperance and Alex Hartlaub First we have Brian’s recipe details, water adjustments from BruN’Water and picture: And now Alex’s recipe details including water adjusts from BeerSmith: Both examples captured that Dunkles Weissbier profile with the aroma, mouthfeel and taste as described. We also had a commercial example to compare to as well – which is always fun! We what will be your next beer to brew? Possibly look into making a Dunkles Weissbier!
Recipe Details
Batch Size
Boil Time
IBU
SRM
Est. OG
Est. FG
ABV
5.3 gal
90 min
11.4 IBUs
20.6 SRM
1.070
1.018
6.9 %
Actuals
1.046
1.01
4.7 %
Style Details
Name
Cat.
OG Range
FG Range
IBU
SRM
Carb
ABV
Dunkles Weissbier
10 B
1.044 - 1.056
1.01 - 1.014
10 - 18
14 - 23
2.9 - 4.1
4.3 - 5.6 %
Fermentables
Name
Amount
%
Rice Hulls (Briess)
1 lbs
6.78
BEST Wheat Malt (BESTMALZ)
7 lbs
47.46
Pilsner (2 Row) Ger
3 lbs
20.34
BEST Munich (BESTMALZ)
1 lbs
6.78
Caramel Malt - 60L (Briess)
1 lbs
6.78
Chocolate Malt - Pale
10 oz
4.24
Melanoidin Light (BestMälz)
10 oz
4.24
Crystal Wheat 60L (Proximity)
8 oz
3.39
Hops
Name
Amount
Time
Use
Form
Alpha %
Wakatu (Hallertau Aroma)
0.75 oz
60 min
Boil
Pellet
4.7
Miscs
Name
Amount
Time
Use
Type
Whirlfloc Tablet
1.00 Items
15 min
Boil
Fining
Yeast
Name
Lab
Attenuation
Temperature
Weihenstephan Weizen (3068)
Wyeast Labs
75%
64°F - 75°F
Mash
Step
Temperature
Time
Beta Glucanase
113°F
10 min
Protease Rest
131°F
10 min
Beta Amylase
149°F
20 min
Alpha-Alylase
154°F
10 min
Mashout
168°F
15 min
Download
Download this recipe's BeerXML file
Recipe Details
Batch Size
Boil Time
IBU
SRM
Est. OG
Est. FG
ABV
11 gal
60 min
16.3 IBUs
20.0 SRM
1.053
1.013
5.3 %
Actuals
1.056
1.01
6.0 %
Style Details
Name
Cat.
OG Range
FG Range
IBU
SRM
Carb
ABV
Dunkles Weissbier
10 B
1.044 - 1.056
1.01 - 1.014
10 - 18
14 - 23
2.9 - 4.1
4.3 - 5.6 %
Fermentables
Name
Amount
%
Wheat - Red Malt (Briess)
10 lbs
47.06
Pilsen Malt 2-Row (Briess)
6 lbs
28.24
Borlander Munich Malt (Briess)
2 lbs
9.41
Acidulated (BestMälz)
1 lbs
4.71
Caramunich II
1 lbs
4.71
Carafa II
12 oz
3.53
Special B Malt
8 oz
2.35
Hops
Name
Amount
Time
Use
Form
Alpha %
Loral
1 oz
60 min
Boil
Pellet
9.5
Miscs
Name
Amount
Time
Use
Type
Baking Soda
3.70 g
60 min
Mash
Water Agent
Epsom Salt (MgSO4)
3.70 g
60 min
Mash
Water Agent
Calcium Chloride
3.00 g
60 min
Mash
Water Agent
Gypsum (Calcium Sulfate)
3.00 g
60 min
Mash
Water Agent
Chalk
1.20 g
60 min
Mash
Water Agent
Calcium Chloride
0.80 g
60 min
Water Agent
Epsom Salt (MgSO4)
0.80 g
60 min
Water Agent
Gypsum (Calcium Sulfate)
0.80 g
60 min
Water Agent
Yeast
Name
Lab
Attenuation
Temperature
Hefeweizen Ale (WLP300)
White Labs
74%
68°F - 72°F
Mash
Step
Temperature
Time
Mash In
152°F
75 min
Ramp up for mash out
168°F
10 min
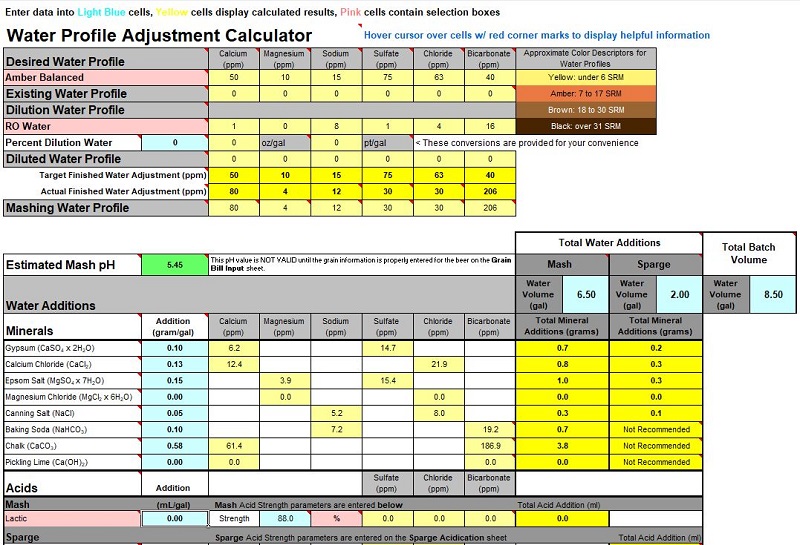
Notes
Profiles (ppm) Exist Mash Finished
Ca 18 51 52
Mg 15 8 11
Na 9 30 26
SO4 24 69 73
Cl 15 46 48
HCO3 91 99 NA
SO4/Cl Ratio 1.5
Batch Volume 15.3 Gallons
Total Mash 12.2 Gallons
Mash Dilution 12.2 Gallons
Total Sparge 3.1 Gallons
Sparge Dilution 0.0 Gallons
Estimated Mash pH 5.46 SU
Mineral Additions (gm) Mash Sparge
Gypsum 3.0 0.8
Calcium Chloride 3.0 0.8
Epsom Salt 3.7 0.9
Mag Chloride 0.0 0.0
Canning Salt 0.0 0.0
Baking Soda 3.7 Not Recommended
Chalk 1.2 Not Recommended
Pickling Lime 0.0 Not Recommended
Sodium Metabisulfite 0.0 0.0
Download
Download this recipe's BeerXML file
Do you listen to podcasts? Do you like beer? Do you like to discuss beer?
Well are you listening to beer related podcasts? No? Why not?
Beer related podcast information coming up just for you!
Click here to see the info: So let us start with the “What’s a podcast?” The apps you can use to subscribe to podcast with are: Now the nitty gritty … What to listen to! The original beer podcasts! Basic Brewing Radio The Brewing Network (The BN) has numerous shows and and various hosts and also has been going since 2005 as well founder by Justin Crossley. With other hosts including: Jason “JP” Petros, Scott “Moscow” Moskowitz, Jamil Zainasheff, John Palmer and the late Mike “Tasty” McDole. Now the new guys to Podcasts …. Experimental Brewing The Beersmith Podcast Not only is Brad Smith the author and creator of BeerSmith brewing software he also has a podcast as well! With each episode having interview with guests, how to brew, techniques and history. Brülosophy Additional Links: The Master Brewers Podcast The MBAA (Master Brewers Association of the Americas) is hosted by John Bryce and interviews with the industry’s best & brightest in brewing science, technology, and operations. Links: And the last two I’ll mention are a little different podcasts …. Milk the Funk: The Podcast Fuhmentaboudit! (Ferment About It!) The hosts Chris Cuzme and Mary Izett (of Fifth Hammer Brewing) aim to demystify the art of home fermentation with a primary focus on home brewing beer. They cover topics from beer, to cheese, to pickles, to sauerkraut, to sake, to kombucha, to water kerif, to kimchi, to makgeoli … basically all things fermented!! So if you’ve never listened to podcast or need something new to check out … you know have hours or brew content to listen to!
Basically a podcast is a combination of the words “iPod” and “broadcasting” … others say the “pod” was for “portable” .. while others refer them to “net cast” to not relate or be confused with Apple’s iPod.
Regardless what you call it though they are basically a digital audio audio file (some are video file format video podcast or vlog) that you download and enjoy. You can subscribe to them via a RSS feed, an application or download them manually. You can listen via your iPhone, Android phone, tablet, computer … any device that can store or stream from.
With an RSS feed you can sync your email client, like Outlook, with the RSS or XML site address. There also are options with apps or via a browser.
http://www.basicbrewing.com/
James Spencer has been doing this podcast since 2005. Doing both audio and video shows.
James starts the shows with the same basic message:
“At Basic Brewing Radio, we’re all about home brewing. Each week, we hope to bring to you interesting interviews with people who can shed light on the hobby, share an interesting story, or give expert advice to help us all become better home brewers.”
Additional Links:
https://www.youtube.com/user/basicbrewing/
https://www.instagram.com/basicbrewing/
https://twitter.com/basicbrewing/
The Brewing Network
http://www.thebrewingnetwork.com/
The main and original podcast is The Session
Other great shows include:
Brew Strong
Dr Homebrew
Brewing with Style
Can You Brew It
The Sour Hour
And many more …
https://www.experimentalbrew.com/
Experimental Brewing, along with The Brew Files, and hosted by Denny Conn and Drew Beechum, authors of Experimental Homebrewing and Homebrewing All-Stars as they explore the world of beer and homebrew.
Both Denny and Drew are also pretty active on Facebook, Reddit and Homebrew Talk. You’ll see Denny posting alot on Wisconsin Homebrewing Community Facebook page even!
Additional Links:
https://www.youtube.com/c/ExperimentalBrewing/
https://www.facebook.com/experimentalbrew/
https://www.instagram.com/experimentalbrew/
http://beersmith.com/
If you haven’t heard of BeerSmith … you need to check it out. You can get a free (21) day trial.
http://beersmith.com/download-beersmith/
List of all the shows:
http://beersmith.com/blog/the-beersmith-podcast-index/
And BeerSmith software overview.
BeerSmith Overview
https://brulosophy.com/
If you like the idea of a triangle test … this one is for you.
Marshall Schott and Brülosophy team first started with their exBEERiments (or xBmt) to test the conventional wisdom and post their results of brewing and brewing techniques. This is by far their best contribution to the brewing community and they eventually transitioned to hosting a podcast as well.
https://brulosophy.com/podcasts/thebrulosophypodcast/
http://facebook.com/brulosophy/
http://instagram.com/brulosophy/
http://twitter.com/brulosopher/
https://www.masterbrewerspodcast.com/
https://www.masterbrewerspodcast.com/episodes/

https://www.milkthefunk.live/
Art Whitaker, Dan Pixley and Dr Matt Humbard talk about mixed and alternative fermentation for beer, wine, mead, and cider. “The Podcast” is an extension of the Milk the Funk Facebook group and Wiki.
Check out the wiki page for all your alternative yeast and bacteria fermentation needs.
http://www.milkthefunk.com/wiki/Main_Page/
https://www.facebook.com/groups/MilkTheFunk/
https://heritageradionetwork.org/series/fuhmentaboudit/
Links
https://www.instagram.com/fuhmentaboudit/
https://www.facebook.com/Fuhmentaboudit/
https://www.instagram.com/mylifeoncraft/
Let’s talk about this easy to make cyser! It is as easy as “dump and stir” .. Well kinda.
First off, ‘What is a cyser?’
– A cyser is a variant of a mead.
Now you ask, ‘What is a mead?’
– A mead is a beverage created by fermenting honey with water. The world’s oldest alcoholic drink and generally called the drink of the Gods! It’s is like beer and not like beer; it’s like wine and not like wine. It is it’s own distinct category and has been around millenia!
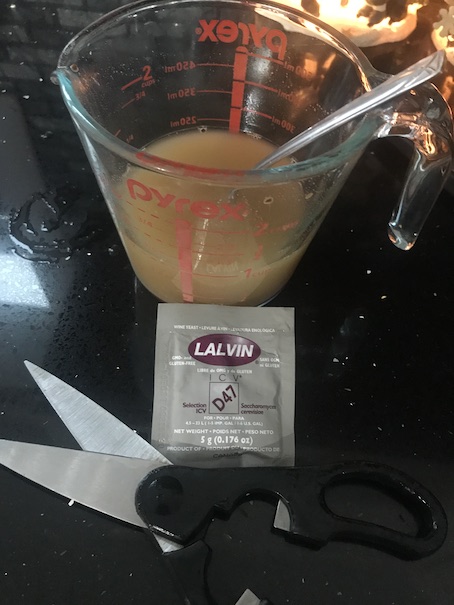
Click here to see the info: So a cyser, is a mead, that is a blend of honey and apple juice and then fermented together. Let’s talk about honey. And next is apple juice or apple cider. And last thing that’s important is yeast. So there you have your main ingredients: Honey, Apple Juice and Yeast. Now we are going to be adding; water, some sugar and yeast nutrients .. but these are optional. So lets see the recipe first: This is for a 5 gallon/19 liter batch size Ingredients: Now Step by Step with Pictures! Start with your store bought apple juice and honey. Since my honey had crystalized some at the top I chose to heat the honey up in a hot water bath. I aimed for the water bath starting at a temperate of ~125ºF which normalized to about 100º after 5 minutes. Now the honey itself probably reached 85º to 90º tops – Heating well aid the honey to pour easily from the container. Be sure NOT to heat the honey up too high because it could change the flavor and not needed at all. As the honey is warming up be sure the sanitize your fermentation vessel and other equipment (like spoon, scissors, airlock, etc.) Sanitizing IS the most important step … Do NOT skip proper sanitization! With the cyser I’m using a bucket since I will be degassing in the next couple days. Degassing is gentle agitating of the must to help get the CO2 out of the fermenting solution. This is done by shaking or stirring Stirring with the using of a wine whip or sanitized spoon works just fine. After sanitizing add you apple juice, or cider, first into the fermenter. I took a gravity reading of the initial apple juice and just like before in the past store bought apple juice is typically a gravity of 1.045. Then adding your honey next. To give you idea adding (1) 40oz / 2.5lbs jug of honey raised the gravity to 1.098! After adding both jugs of honey (totaling 5 lbs) start adding water (1/2) gallon at a time. Stirring thoroughly to incorporate the apple juice and honey to each other. Now moving to the yeast. Rehydrating dry yeast is a simple step and helps it to give it a good start. And with this I’m using Go-Ferm as well with rehydration. First start by heating 1 cup of water to approximately 100ºF. Adding 1-1/2tsp of G0-Ferm and stirring until dissolved. Let sit about 5/10mins. Ensure the water is under 100ºF sprinkle the dry D-47 yeast on top of the Go-Ferm slurry. Now the addition of DAP and FermAid-K. I also will be doing a Staggered Nutrient Addition (SNA) during the fermentation. This is something typical mead makers utilize. Now add your airlock and allow to ferment. Typical room temperature is fine but try to stay within the yeast temperature range, which for D-47 is 60-68°F – I’m controlling the ferment temp at 64ºF Ferment your cyser until reaching finishing gravity and is stable. Typically 2 to 3 weeks is when you can take gravity readings. Then bottle still, keg and force carbonate or in this case I might be back sweetening and bottling. I’ll be back sweetening by first adding 7-1/2 tsp of potassium sorbate for the 5 gallon batch (1/2tsp per gallon), let sorbate sit for 1 week. Then adding back sugar (honey or apple juice concentrate) in small increments, thoroughly stirring and then testing until the desired sweetness. Then proceed to bottling. The sorbate will inhibit the yeast from fermenting the addition of new sugars. Never back sweeten a wine, cider, mead or cyser and bottling with out adding sorbate – Skipping this step will be explosive … no really bottle bombs are no joke! Now hopefully your cyser will be your next go to drink! And drink it like a Norse God!
So lets start with that … Honey and Apple Juice.
Now we can on and on about honey but we’re talking about ‘Easy to Make Cyser’ so store bought honey is what we’re using here. Typically clover honey is what you’ll find in the stores. Sometimes you’ll find wildflower honey and maybe even orange blossom. What you are looking for are the words in honey like: “pure”, “100%”, “raw” or “unpasteurized”. If the honey is “pasteurized” or “filtered” this is fine, this usually means the the natural wild yeast has been killed off and done to slow down the crystallization. But it needs to be honey.
Watch out for the honey that comes in a little bear … this usually is “fake honey” and mainly is sugar, cornstarch and artificial sweeteners. A good test for honey is this: Place a few drops of the honey on a paper towel. If it is honey, it will stay solid and not soak through. If it’s not honey it will wet the paper towel and soak through the paper towel.
Again we’re looking for easy so we’re using store bought juice, or fresh cider from the store. Be sure that it is “100% juice.” It can be pasteurized, it can have ascorbic acid or vitamin C which is commonly added to store bought apple juice. This will not harm the fermentation. Just be sure it has no preservatives at all this will not all the juice to ferment.
Brands like Tree Top, Mott’s or house store brand – whatever you can find that doesn’t have any preservatives (specifically sorbets). Potassium sorbate is a growth inhibitor for yeast and will not allow the yeast to grow and ultimately ferment the juice.
With the batch I chose Lalvin D-47 – which is a white wine yeast. You want a yeast that will leave some body and sweetness after fermentation. A champagne yeast will ferment down to bone dry and leave no body or sweetness behind. Unless this is what you are going for. Depending on your starting gravity and estimated alcohol you can use beer ale yeast as well. But I’d recommend sticking to wine yeasts like: D-47 or 71B for the best results.
OG = 1.060 (What I was targeting)
FG = 1.000 (Estimated)
Est. ABV = 7.8%
Optional ingredients which I’ll be using:
(If desired for cider to kill off wild yeast and if you’re using tap water to rid you of chlorine and chloramine)
(A natural yeast rehydration nutrient added to the yeast hydration water)
Staggered Nutrient Adds (SNA) – See below
(A yeast energizer)
(A yeast nutrient)
Possible additions at the end – Again these are OPTIONAL as well


I’m using StarSan, you can also use other sanitizes like OneStep, IOStar or Iodophor.

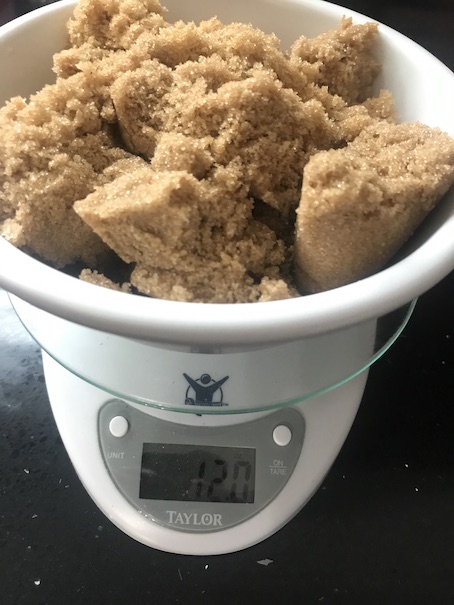
After adding 2 gallons of water the gravity was at 1.079. Now this is a optional step I added 12oz [or 3/4 lbs] of brown sugar and ended up adding 3.25 gallons of water reaching just under 5 gallons and an original gravity of 1.060. This was is my desired starting point for my cyser.

And let sit until yeast starts to show activity. About 20mins total time for rehydration process.


I’ll be using a modified technique that Ken Schramm made famous. Which is:
When degassing and adding nutrients, do it slowly to avoid rapid foaming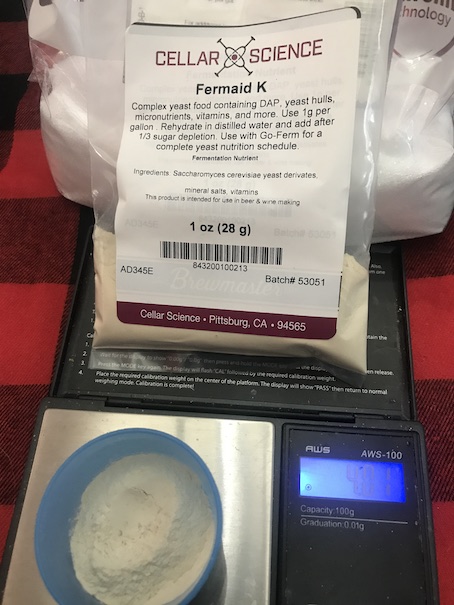


For January’s meeting we’re having the final for the 2020 Iron Brewer! With a head, to head, to head 3-way battle brewing a Swedish-Style Gotlandsdricke.
So if you’re interested in learning about this and trying a Gotlandsdricke (also spelled Gotlandsdricka) be sure to attend January’s meeting!!
A Gotlandsdricke is a very unique beer (smoked malt, juniper, etc.) – closely related to the Finnish Sahti and a Norwegian Maltøl.
Here is a brief description of the beer:
Swedish-Style Gotlandsdricke
(From Brewers Association Beer Style Guidelines)
Color: Pale to Copper
Clarity: Chill haze or yeast haze is acceptable
Perceived Malt Aroma & Flavor: Medium-low to medium. Birchwood smoke character, derived from the malting process, should be present.
Perceived Hop Aroma & Flavor: Not present to very low
Perceived Bitterness: Very low to medium-low
Fermentation Characteristics: Bread/bakers’ yeast is traditionally used for fermentation and contributes to unique character of these beers. Fruity ester and yeasty aromas are medium to high. Diacetyl should not be present.
Body: Medium to full
Additional notes: Juniper aroma and flavor should be present due to the use of juniper boughs/branches and berries in the brewing process. These beers are characterized by juniper and birchwood smoked malt.
Original Gravity (°Plato) 1.040-1.050 (10-12.4 °Plato)
Apparent Extract/Final Gravity (°Plato) 1.010-1.014 (2.5-3.5 °Plato)
Alcohol by Weight (Volume) 4.4%-5.2% (5.5%-6.5%)
Bitterness (IBU) 15-25
Color SRM (EBC) 4-12(8-24 EBC)
Want to learn more? Check out these links:
https://www.garshol.priv.no/blog/363.html
https://beersforbreakfast.wordpress.com/2013/12/11/gotlandsdricka/
https://www.hopculture.com/definition-swedish-style-gotlandsdricka/
https://www.youtube.com/watch?v=9zX8EeGTsyA&ab_channel=TheMasterofHoppets
And how’s your Swedish?
https://www.youtube.com/watch?v=in6quG7T0f4&ab_channel=helagotland
| Monday | Tuesday | Wednesday | Thursday | Friday | Saturday | Sunday |
|---|---|---|---|---|---|---|
July 1, 2024
|
July 2, 2024
|
July 3, 2024
|
July 4, 2024
|
July 5, 2024
|
July 6, 2024
|
July 7, 2024
|
July 8, 2024
|
July 9, 2024
|
July 10, 2024
|
|
July 12, 2024
|
July 13, 2024
|
July 14, 2024
|
July 15, 2024
|
July 16, 2024
|
July 17, 2024
|
July 18, 2024
|
July 19, 2024
|
July 20, 2024
|
July 21, 2024
|
July 22, 2024
|
July 23, 2024
|
July 24, 2024
|
July 25, 2024
|
July 26, 2024
|
July 27, 2024
|
July 28, 2024
|
July 29, 2024
|
July 30, 2024
|
July 31, 2024
|
|
August 2, 2024
|
August 3, 2024
|
August 4, 2024
|